
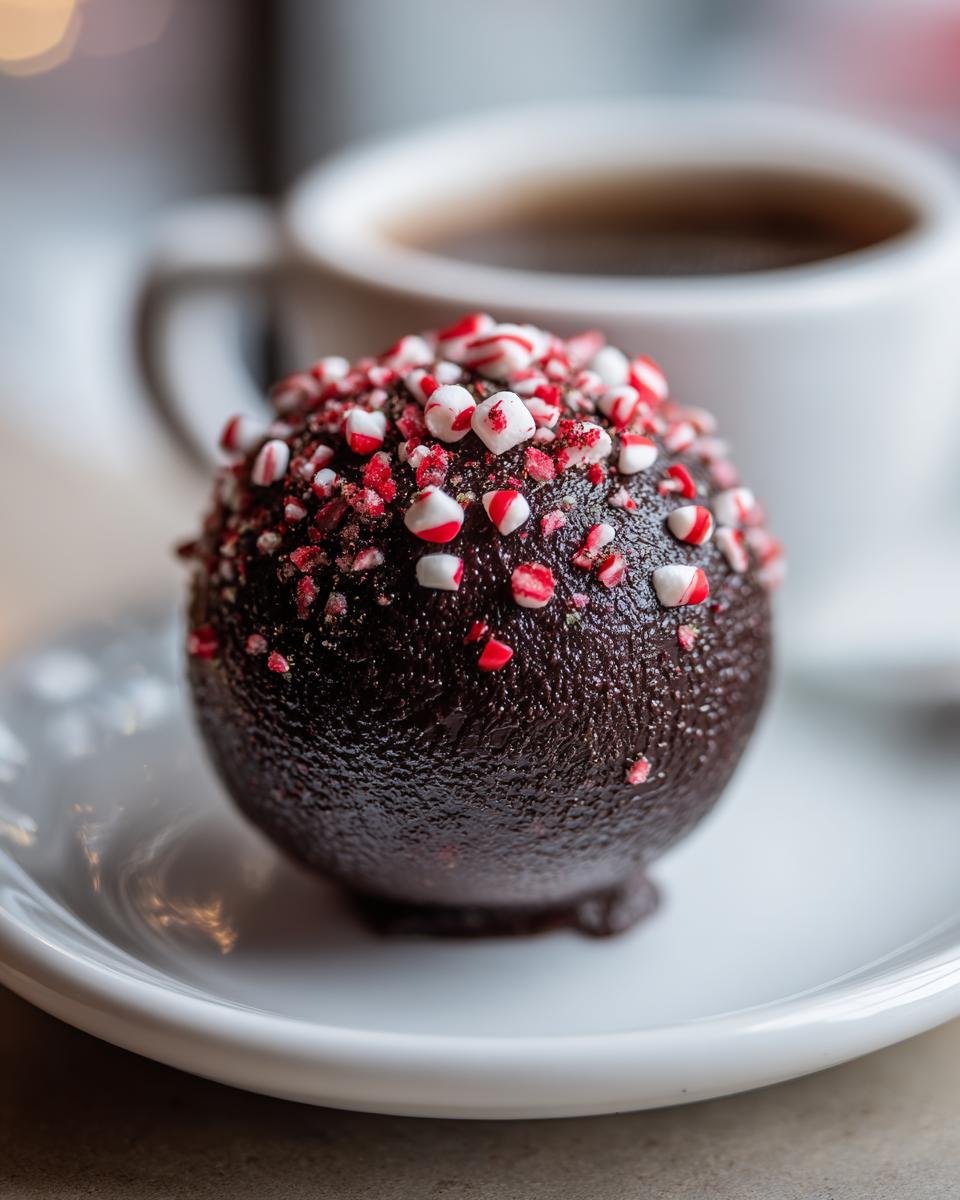
There is just something about that first truly cold day when you have to bundle up just to check the mail, right? That’s when I immediately crave something warm, rich, and completely cozy. Forget boring mugs of milk; we are leveling up our winter game with these absolutely show-stopping Peppermint Hot Cocoa Bombs. Seriously, I promise you, these are the easiest, most impressive chocolate spheres you will ever make, and they feel like such a treat!
I started making these a few years ago, and now I can’t stop. They are the perfect thing to whip up for a fun Friday night project when the kids are home, or honestly, they make the most charming little gifts wrapped up in cellophane for neighbors and teachers. Once you see that chocolate shell blast open in hot milk, you’ll be hooked!

Why You Need to Make Peppermint Hot Cocoa Bombs Today
If you’re wondering if these are too fussy for a weeknight, let me stop you right there! These beauties are all about spectacular results with surprisingly little effort. They just look like you spent hours in the kitchen, but trust me, you didn’t.
- They add instant magic to a plain mug of milk—the visual effect is incredible!
- The blend of dark chocolate and cool peppermint is pure winter perfection.
- They are so simple to personalize before you seal them up!
If you are looking for a decadent upgrade to your usual cozy drink time, you absolutely have to try them. We even have a recipe for creamy hot chocolate that would pair perfectly with these if you want to skip the bomb step entirely!
Quick Assembly for Perfect Peppermint Hot Cocoa Bombs
Once you get the knack for making your chocolate shells—which takes just a little practice, promise—putting them together is lightning fast! This is where you get to have fun. You just drop your cocoa and marshmallows inside, seal them up, and decorate. Seriously, the sealing step takes maybe 30 seconds per bomb once the edges are prepped. It makes constructing these Peppermint Hot Cocoa Bombs a total breeze, even if you think you aren’t great with candy making. It’s really just glorified chocolate gluing!
Essential Ingredients for Your Peppermint Hot Cocoa Bombs
Okay, let’s talk stuff you need to buy. You can’t make these magic orbs without the right players! We need about 6 ounces of semi-sweet chocolate, and don’t skimp here—good chocolate melts better, which means prettier shells! Then you’ll want those super cute 1/4 cup of mini marshmallows and 2 tablespoons of hot cocoa mix for the insides of each bomb. The peppermint chips are optional but highly encouraged!
Also, don’t forget the crushed peppermint candies for the final garnish! If you’re interested in other fun treats, check out this amazing chocolate chip cookie dough dip recipe while you’re raiding your pantry!
Ingredient Notes and Substitution Tips
If you’re having a hard time tracking down those peppermint baking chips, don’t panic! You can absolutely still get that signature flavor. Just melt your main chocolate, and then stir in about half a teaspoon of good quality peppermint extract right before you coat your molds. Be careful though, extract is strong, so start small!
The quality of your initial chocolate really dictates how beautiful your final Peppermint Hot Cocoa Bombs turn out. If you use cheap stuff, it might look streaky or not melt smoothly, and we want those shiny shells, right? High-quality chocolate—whether it’s chips or bars—is your best friend here for that perfect snap!
Equipment Needed to Create Peppermint Hot Cocoa Bombs
You don’t need a ton of fancy gadgets for this, which is great news! The absolute star of the show here is your mold. You really, really want silicone sphere molds, preferably ones that make nice, medium-sized balls so they fit perfectly in a standard mug. If you only have plastic candy molds, you can make it work, but getting those chocolate half-spheres out in one piece can be tricky, so silicone is my humble advice!
Beyond the mold, you’ll need bowls for melting your chocolate—I usually use a glass bowl set over a saucepan for a makeshift double boiler, or you can just use the microwave carefully. You’ll also need a small, clean plate that you’ll heat up later for sealing the halves together! That little plate is our secret weapon for smooth seams.
Here’s a little pro trick you absolutely need to know: grab a small offset spatula! It’s usually used for frosting cakes, but I use mine constantly when chocolate is involved. Once you’ve brushed your chocolate into the molds, you can use the tip of the spatula to gently smooth out any thick edges or drips before you chill them. It helps guarantee those clean, professional-looking Peppermint Hot Cocoa Bombs!
Step-by-Step Instructions for Making Peppermint Hot Cocoa Bombs
Alright, this is where the fun really starts! Don’t let the process scare you; we are just working with melted chocolate, and if you follow this timing, you’ll have perfect little spheres ready for the fridge. Think of this in three simple stages: making the shells, filling them, and then sealing them up tight to make your final Peppermint Hot Cocoa Bombs!
First things first: melt your chocolate mixture. If you’re using those peppermint chips, toss them in with your semi-sweet chocolate and melt them gently using a double boiler or just short zaps in the microwave—stirring every 30 seconds is key so you don’t burn it! You want it completely smooth, looking just as gorgeous as the royal icing we use sometimes for decorating!
Creating Strong Chocolate Shells for Your Peppermint Hot Cocoa Bombs
Now, grab those silicone molds. Using a small pastry brush—and I mean small—coat the inside of the mold wells with a nice, even layer of your melted chocolate. Make sure you go all the way up to the rim! If you see any thin spots or patches where the mold material shows through, that’s a weak spot waiting to break later, so patch it up now. Trust me, the second layer makes all the difference here.
Once brushed, these need to chill. Pop the molds into the refrigerator for about 10 minutes. When they come out, they should be hard. Now, here’s the secret handshake: you must apply a second layer! This second coat is what gives your Peppermint Hot Cocoa Bombs the strength they need to hold all the cocoa goodness inside. Brush the second layer thinly and evenly, and then pop them back into the fridge for another 10 minutes until they are totally set. Try not to touch the chocolate surfaces while handling them; those fingerprints show up big time!
Gently peel the chocolate halves out of the molds. Patience is vital here; if you rush, they crack. You should end up with 12 beautiful half-spheres, ready for filling.
Assembling and Sealing the Peppermint Hot Cocoa Bombs
This sealing step is what makes or breaks the shape, so listen up! You need a plate slightly warmer than room temperature—I carefully microwave a small, clean plate for about 30 seconds until it’s just warm to the touch, not hot enough to burn you. Take one empty half-shell and gently touch its rim to that warm plate for just a second or two. You just want the edge to get slightly tacky, not liquidy!
Working quickly now, fill that tacky half-shell with your hot cocoa mix and a scoop of mini marshmallows. Then, take a second rimmed half-shell, gently warm *its* edge the same way, and carefully place it on top of the filled half. Press GENTLY down until the two rims meet and seal together. This is what creates the full sphere of your Peppermint Hot Cocoa Bombs.
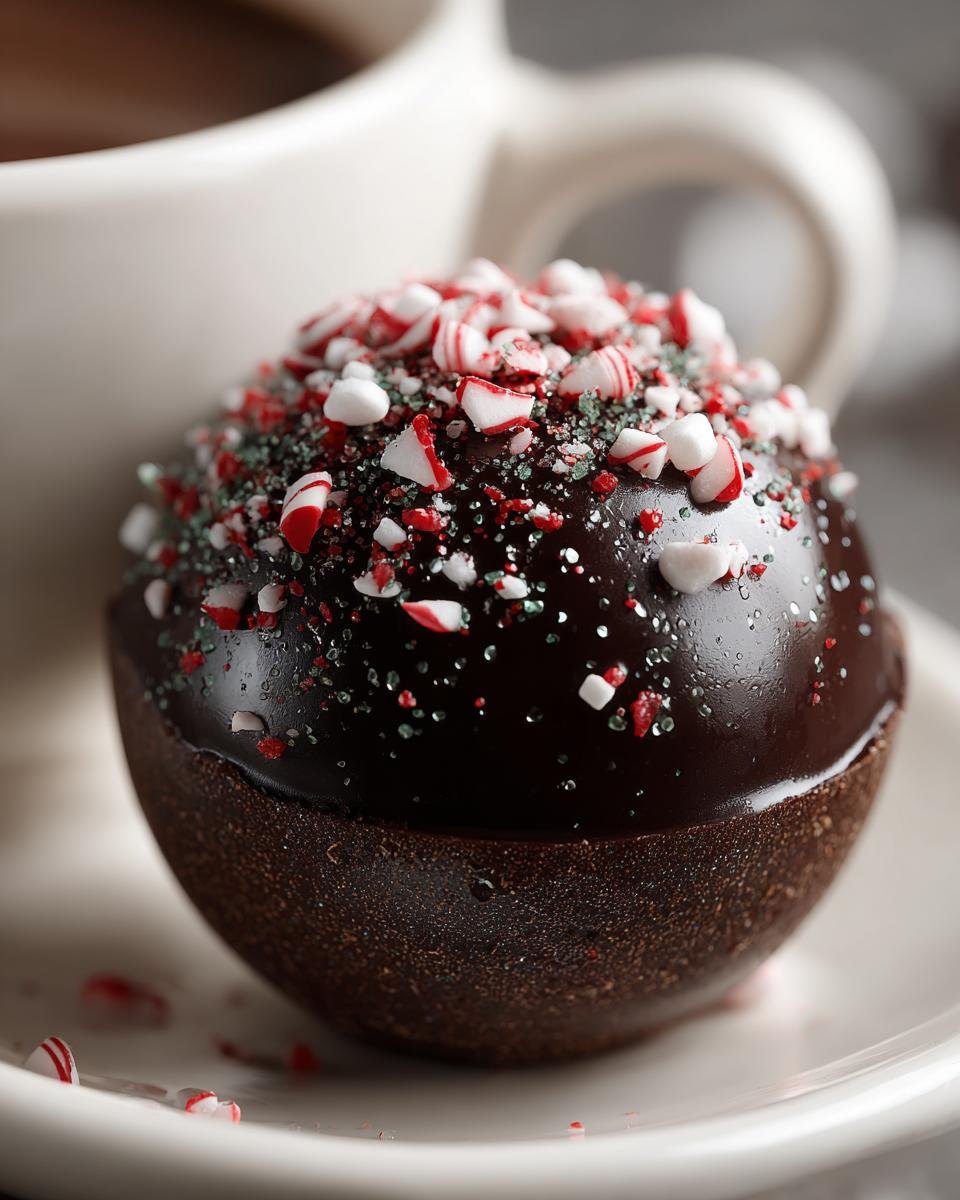
If the seam isn’t perfectly sealed—and honestly, it usually isn’t on the first try—grab some of your remaining melted chocolate and pipe a thin decorative line right over that seam. This seals it up tight and makes it look extra pretty. Finally, top the seam with a tiny dab of chocolate and press your crushed peppermint candies onto it! Set these beauties aside on parchment paper until they are completely firm again.
Tips for Success When Making Peppermint Hot Cocoa Bombs
I’ve made enough of these chocolate spheres to know that things can go a little sideways sometimes when you’re working with melted chocolate, especially when you seal them up. Don’t stress if your first batch isn’t perfect! That’s part of the learning curve when making Peppermint Hot Cocoa Bombs.
The number one panic moment is when your chocolate suddenly gets thick and grainy—that’s called seizing! If this happens while you’re brushing the molds, it means a tiny drop of water got into your bowl. Don’t throw it out! I stop everything, quickly add a teaspoon of neutral oil or coconut oil, and stir like crazy. It usually loosens right back up and becomes workable again. It might not be *quite* as shiny, but it will still hold its shape for the shells.
Another thing I notice, especially if I’m working in an older house where the temperature swings, is condensation. If your chocolate shells come out humid or sticky after chilling, they are sweating! The shells need to be completely dry before you try to seal them, otherwise, they melt right back into mush. If they are clammy, put them back in the fridge for 15 minutes, but keep them in an air-tight container after they are completely cool and dry to prevent that ickiness in the first place.
Finally, remember that the warm plate trick for sealing has to be done quickly. If the plate is too hot, you melt too much of the rim, and the bomb collapses or warps. If it’s too cool, they just won’t stick! If I find the filling is melting out before I can seal the second side, I chill the filled half briefly—maybe just 5 minutes—before applying that final, slightly warmed rim. It gives you a little more wiggle room. Honestly, the more you play around making these wonderful Peppermint Hot Cocoa Bombs, the faster you’ll learn what works best for your kitchen environment. If you’re looking for more fun dips and treats, you should see the recipe for this amazing cookie dough dip!
Storage and Best Way to Use Peppermint Hot Cocoa Bombs
So, you’ve made your gorgeous batch of Peppermint Hot Cocoa Bombs, and now you’re done! Congrats! The next big question is how to keep them safe until you’re ready to enjoy them, especially if you plan on gifting them. Chocolate is pretty happy on its own, but we need to protect those delicate shells from temperature changes and sticky surfaces.
The key here is keeping things cool and dry. Don’t put them in the fridge unless your house is seriously baking hot, because the humidity in the fridge can cause condensation, and nobody wants sweaty chocolate balls! I store mine in a large, air-tight container on the counter, or sometimes even in a cool pantry. They last beautifully for a good two to three weeks this way, maintaining that perfect snap.
If you’ve got a lot of leftovers, check out this fun idea for a dessert in a cup! It’s a different direction, but still involves maximizing cozy flavors.
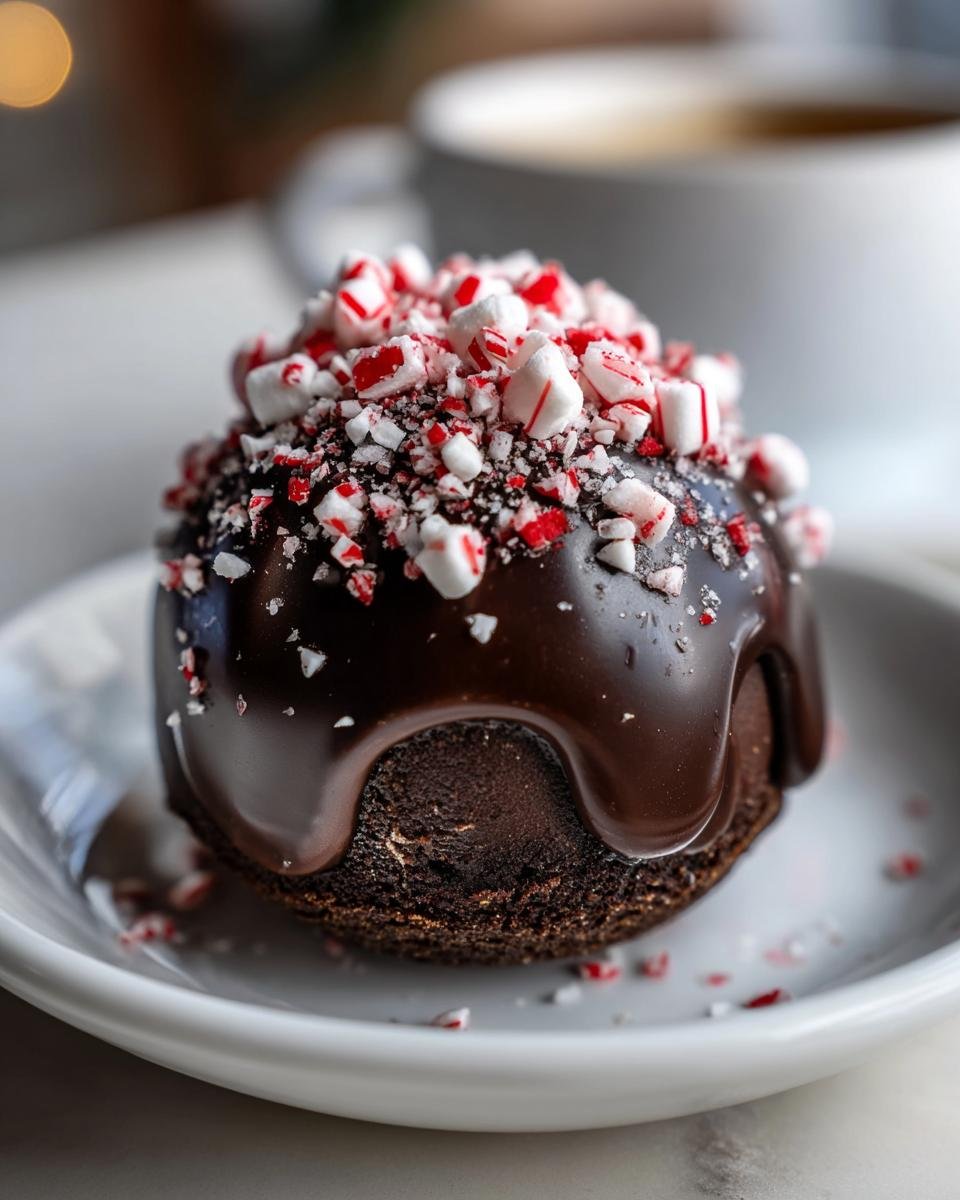
Now for the fun part—using them! This is why we went through all that trouble melting and molding. For the absolute best experience, you need to take just one Peppermint Hot Cocoa Bomb and set it right in the bottom of your favorite mug. Then, you gently pour about one cup of steaming hot milk right over the top. Watch the magic happen!
The chocolate shell melts away dramatically, releasing all those hot cocoa powders and mini marshmallows right into the milk. Give it a good stir until everything dissolves completely. The color change and the blast of peppermint aroma when the milk hits the cocoa mix seriously lights up my morning. It’s worth the effort every single time!
Variations on Classic Peppermint Hot Cocoa Bombs
I truly believe that once you master the basic technique for making these, you should immediately start experimenting! The beauty of chocolate shells is that they act like delicious little edible containers for anything you love. While the classic mint and chocolate pairing is unbeatable, why stop there when your homemade Peppermint Hot Cocoa Bombs shells are ready for innovation?
First up, let’s talk chocolate base. If semi-sweet is a little too intense for you, try making the shells entirely out of white chocolate. White chocolate often takes on coloring really well, so you could even tint those shells a fun pale green or bright red for Christmas! On the flip side, if you’re a dark chocolate purist, go for an 80% cacao bar instead of semi-sweet for a much richer, slightly bitter shell that contrasts amazingly with the sweet filling.
The filling is where you can really go wild. Instead of standard hot cocoa powder, try using my favorite spicy Mexican hot chocolate mix—it uses a hint of cinnamon and chili powder, which is fantastic with the peppermint garnish! You can also swap out the mini marshmallows for tiny caramel cubes or maybe even a few chocolate-covered espresso beans for an adult kick. If you want to see some other fun, handheld treats, you simply have to look at these no-bake truffle recipes!
When decorating the outside, think beyond crushed candy canes. You can use rainbow sprinkles, chopped nuts like pecans or hazelnuts, or even drizzle the finished, sealed bomb with a different kind of melted chocolate! A zig-zag of dark chocolate over a milk chocolate shell looks really sophisticated. Don’t be afraid to turn your standard Peppermint Hot Cocoa Bombs into custom creations for every person you gift them to this year.
Frequently Asked Questions About Peppermint Hot Cocoa Bombs
It seems like every time I make a batch of these, my friends and family suddenly remember they have questions! It’s totally normal because working with tempered chocolate can feel a little tricky at first. But don’t worry, I’ve collected the ones I get asked the most right here. Hopefully, this helps you get perfectly sealed spheres!
Can I make Peppermint Hot Cocoa Bombs without silicone molds?
You know, I really, really suggest sticking to silicone if you can, especially for your first go-around. Silicone is so flexible that the chocolate just pops right out when it’s hard. If you absolutely cannot find one, you can try using one of those hard plastic candy molds you might have lying around. The only catch is that you have to be incredibly patient and gentle when trying to remove the chocolate half-spheres. You usually have to carefully peel the plastic mold away from the chocolate edge by edge, and often, one or two shells will crack. It’s doable, but it adds a layer of difficulty to making your Peppermint Hot Cocoa Bombs!
How long do Peppermint Hot Cocoa Bombs last when stored properly?
This is one of the best parts! Since we aren’t adding anything perishable inside—just dry cocoa mix and dried marshmallows—they have a great shelf life. If you store your bombs in an airtight container in a cool, dark place (maybe a cupboard away from the oven!), they should stay perfect for a good two to three weeks. If your house is super warm or humid, you might want to drop them into the fridge, but make sure they are completely sealed so they don’t absorb any smells or sweat! If you are looking for other fun, low-effort treats, you really must check out these easy no-bake dump cakes.
What is the best chocolate to use for the shells?
This is where I tell everyone to spend just a couple of extra dollars! You want chocolate that melts smoothly and sets up hard and shiny. I strongly recommend using high-quality chocolate melting wafers or compound coatings if you are a beginner. They are specifically designed to melt beautifully without needing to temper them perfectly, which takes the stress out of the whole process. If you use standard chocolate chips, you might have to add a little bit of vegetable shortening or oil to get the right texture for brushing. For the prettiest, snappiest shells on your Peppermint Hot Cocoa Bombs, go for the good stuff!
Nutritional Estimates for Peppermint Hot Cocoa Bombs
Now, I know when we’re making something this fun and decadent like our Peppermint Hot Cocoa Bombs, we aren’t really making them for a spa meal, right? But sometimes you just want a general idea of what you’re diving into! I’ve put together the estimates based on the standard serving sizes, but please, please remember this is just a general guide.
Ingredient brands make a huge difference! The cocoa mix you pick, or even the fat content in your specific semi-sweet chocolate, can shift these numbers around like crazy. I usually just keep that in mind and enjoy the treat guilt-free because they are so worth it!
- Serving Size: 1 bomb
- Calories: 250
- Sugar: 25g
- Sodium: 30mg
- Fat: 16g
- Saturated Fat: 10g
- Unsaturated Fat: 6g
- Trans Fat: 0.5g
- Carbohydrates: 28g
- Fiber: 2g
- Protein: 4g
- Cholesterol: 10mg
This data is just a snapshot, so take it with a grain of salt (or maybe a pinch of crushed peppermint, which is way better!).
Print
Peppermint Hot Cocoa Bombs
- Total Time: 35 min
- Yield: 6 servings 1x
- Diet: Vegetarian
Description
Simple recipe for making chocolate spheres filled with cocoa mix and marshmallows that melt in hot milk.
Ingredients
- 6 ounces semi-sweet chocolate, chopped
- 1/4 cup peppermint baking chips (optional)
- 2 tablespoons hot cocoa mix per bomb
- 1/4 cup mini marshmallows per bomb
- Peppermint candies, crushed, for garnish
Instructions
- Melt the semi-sweet chocolate and peppermint chips (if using) together in a double boiler or microwave until smooth.
- Lightly brush the inside of silicone sphere molds with melted chocolate, ensuring full coverage.
- Place the molds in the refrigerator for 10 minutes to set the chocolate.
- Apply a second thin layer of melted chocolate to the inside of the molds for strength. Chill again for 10 minutes.
- Carefully remove the hardened chocolate shells from the molds. You should have 12 half-spheres.
- Warm a small, clean plate in the microwave for 30 seconds.
- Take one half-sphere rim and gently press it onto the warm plate for a few seconds to slightly melt the edge.
- Place the hot cocoa mix and marshmallows inside the melted-rim half-sphere.
- Take a second half-sphere rim and melt its edge slightly. Place this rim onto the filled half-sphere to seal the bomb.
- Use a small amount of leftover melted chocolate to pipe a decorative line around the seam to secure it.
- Pipe a small dot of melted chocolate onto the top of the sealed bomb and press crushed peppermint candies onto it.
- Allow all bombs to set completely before use.
Notes
- To use, place one bomb in a mug and pour 1 cup of hot milk over it. Stir until melted.
- If you do not have silicone molds, you can use a plastic candy mold, but removal may be more difficult.
- Use high-quality chocolate for the best flavor and melting quality.
- Prep Time: 30 min
- Cook Time: 5 min
- Category: Dessert
- Method: Molding
- Cuisine: American
Nutrition
- Serving Size: 1 bomb
- Calories: 250
- Sugar: 25
- Sodium: 30
- Fat: 16
- Saturated Fat: 10
- Unsaturated Fat: 6
- Trans Fat: 0.5
- Carbohydrates: 28
- Fiber: 2
- Protein: 4
- Cholesterol: 10
Keywords: hot cocoa, chocolate, peppermint, winter drink, hot chocolate bombs, candy