
Oh, hello there, fellow sweet tooths! If there’s one thing that just screams “celebration” or “I love you” in our house, it’s a homemade cake. And let me tell you, this isn’t just any cake. We’re diving headfirst into the glorious world of Chocolate Kinder Cakes today! I stumbled upon the idea for this beauty a few years back when my niece, bless her Kinder-loving heart, begged for a cake that tasted like her favorite chocolate bar for her birthday. Challenge accepted, right?
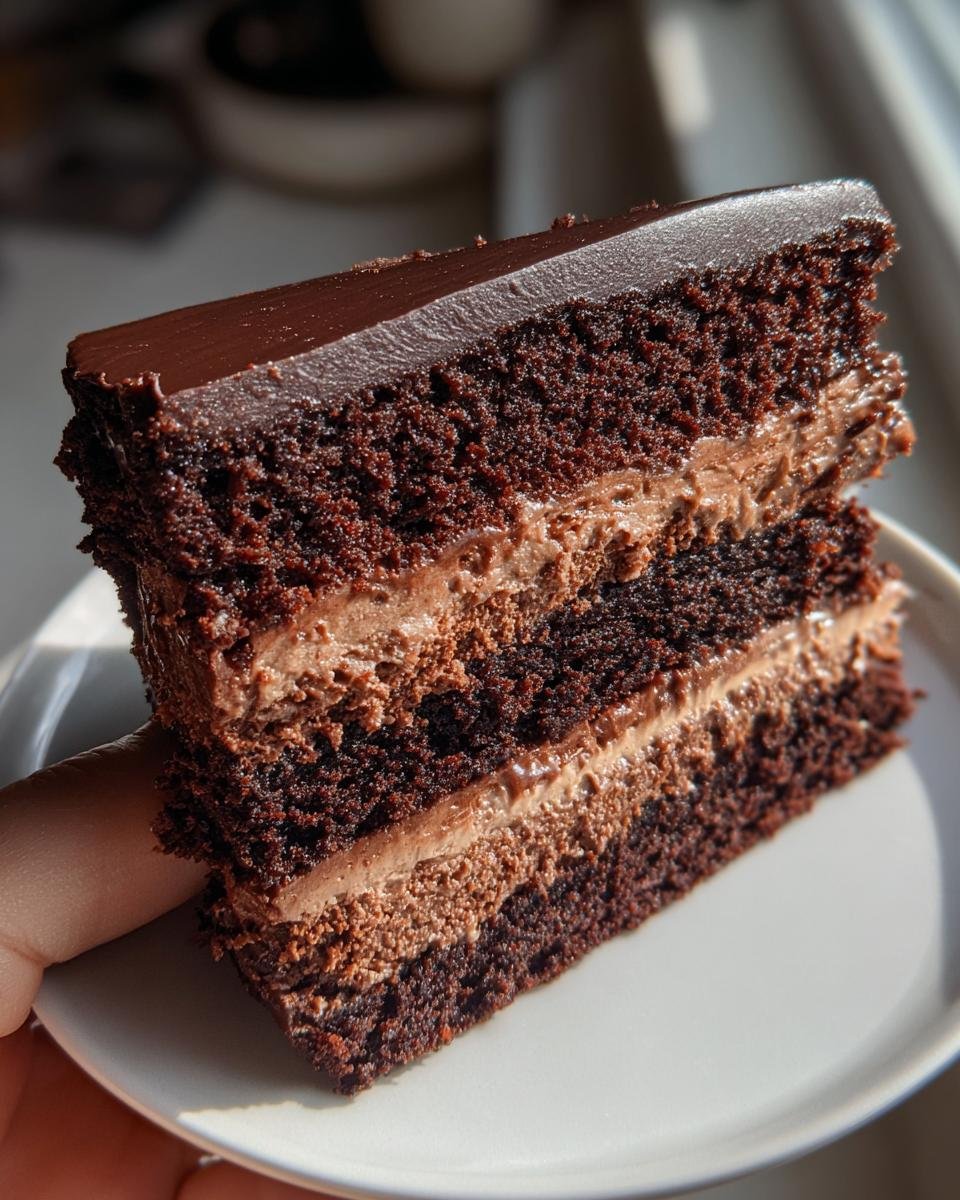
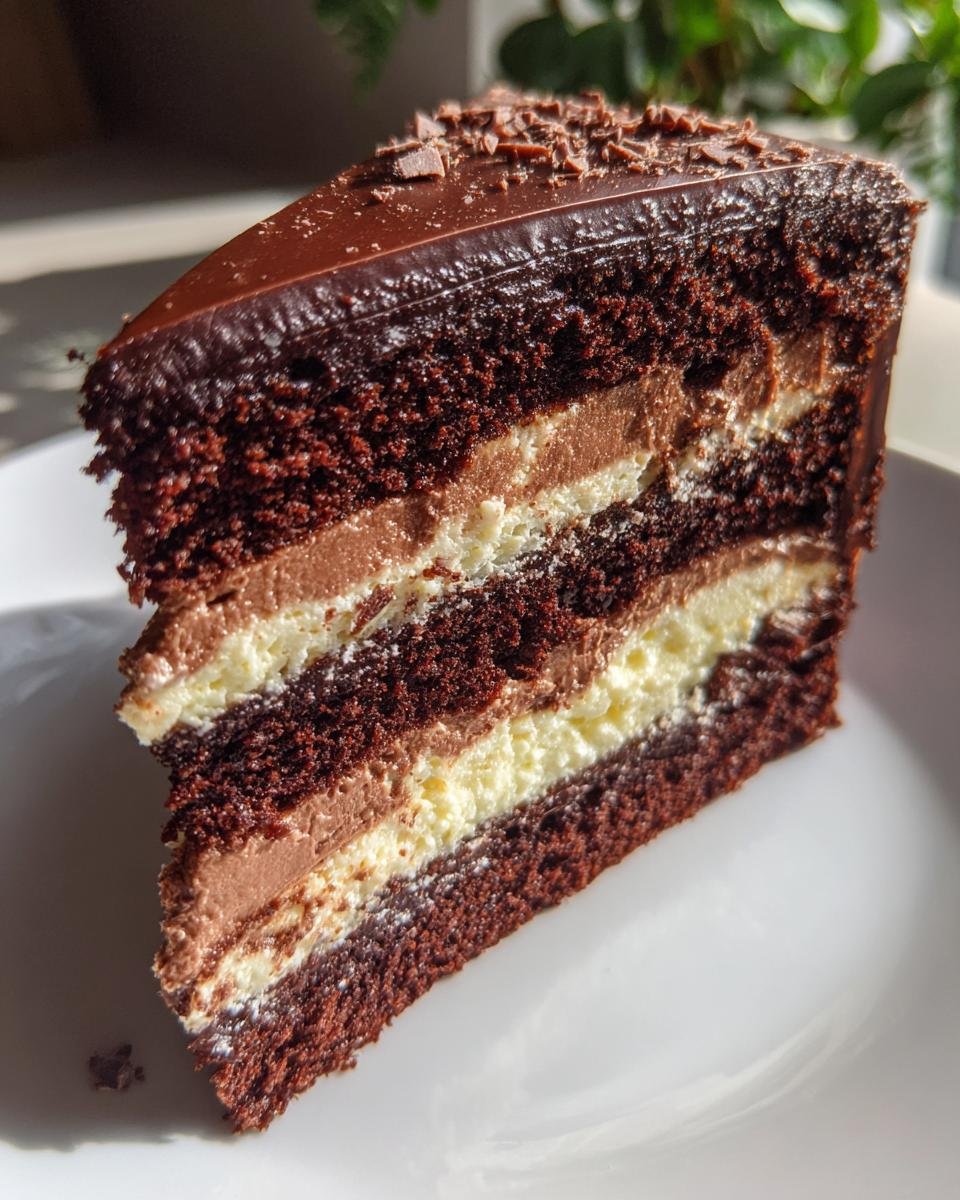
What started as a fun experiment quickly became a family legend. This cake is pure magic – we’re talking rich, moist chocolate sponge, ridiculously creamy Kinderella filling (yes, that’s a thing, and it’s heavenly!), and a smooth, dreamy chocolate ganache. Then, of course, it’s topped with all those classic Kinder chocolates we adore. It truly delivers that special something, making any occasion feel extra fancy without being overly complicated. Trust me, you’re going to feel like a baking superstar when you pull this one off!

Why You’ll Adore These Chocolate Kinder Cakes
Okay, so why *this* Kinder cake above all others? Well, for starters, it’s just so darn easy to make, even if you’re not a seasoned baker. But beyond that, it’s got that perfect balance of everything you want in a special occasion dessert:
- It’s a total showstopper, guaranteed to get oohs and aahs when you bring it out.
- The flavors are just incredible – that deep chocolate with the creamy, milky Kinder goodness.
- You get to say, “Oh, I made that!” and trust me, that feeling is priceless.
It’s truly a joy to create and even more of a joy to eat!
The Irresistible Charm of Chocolate Kinder Cakes
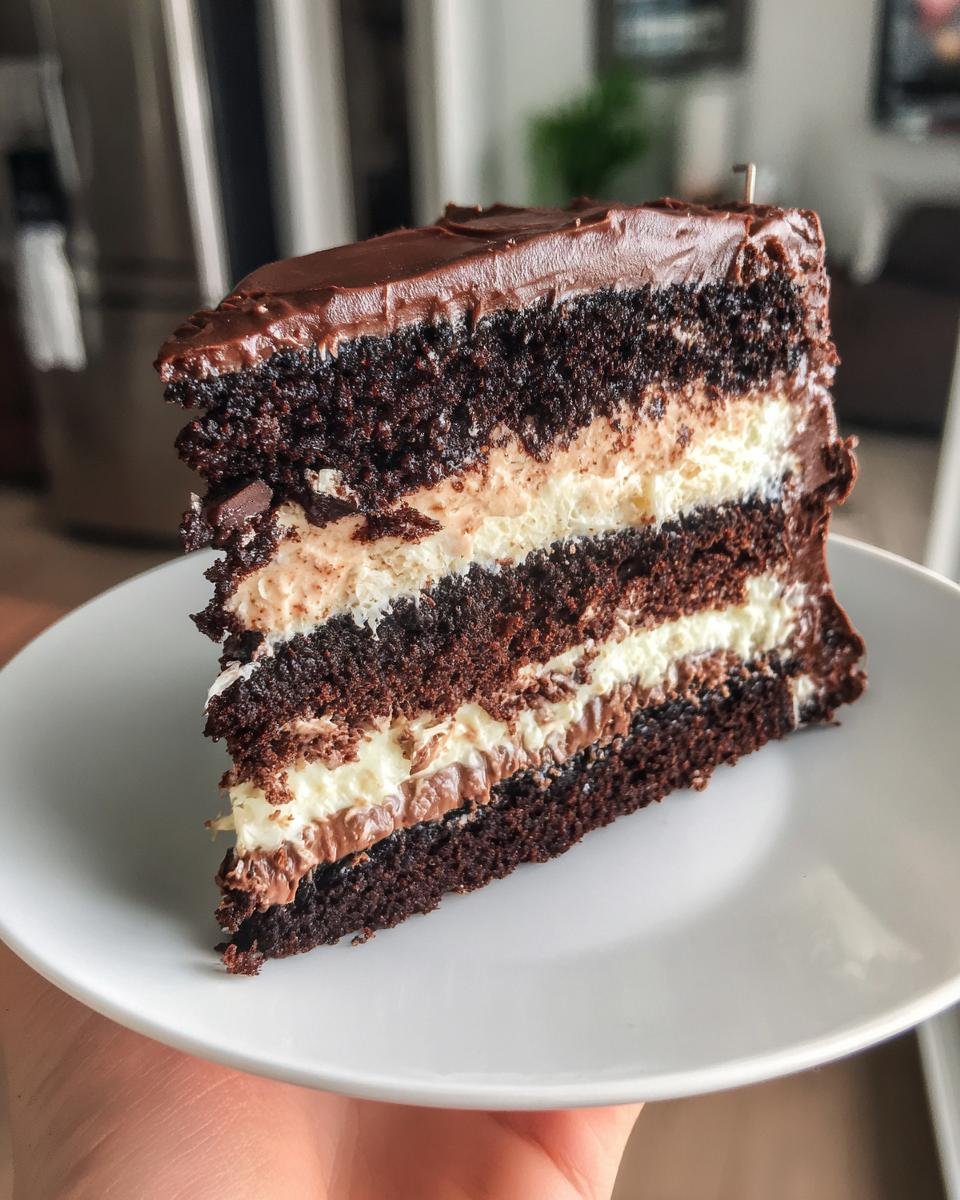
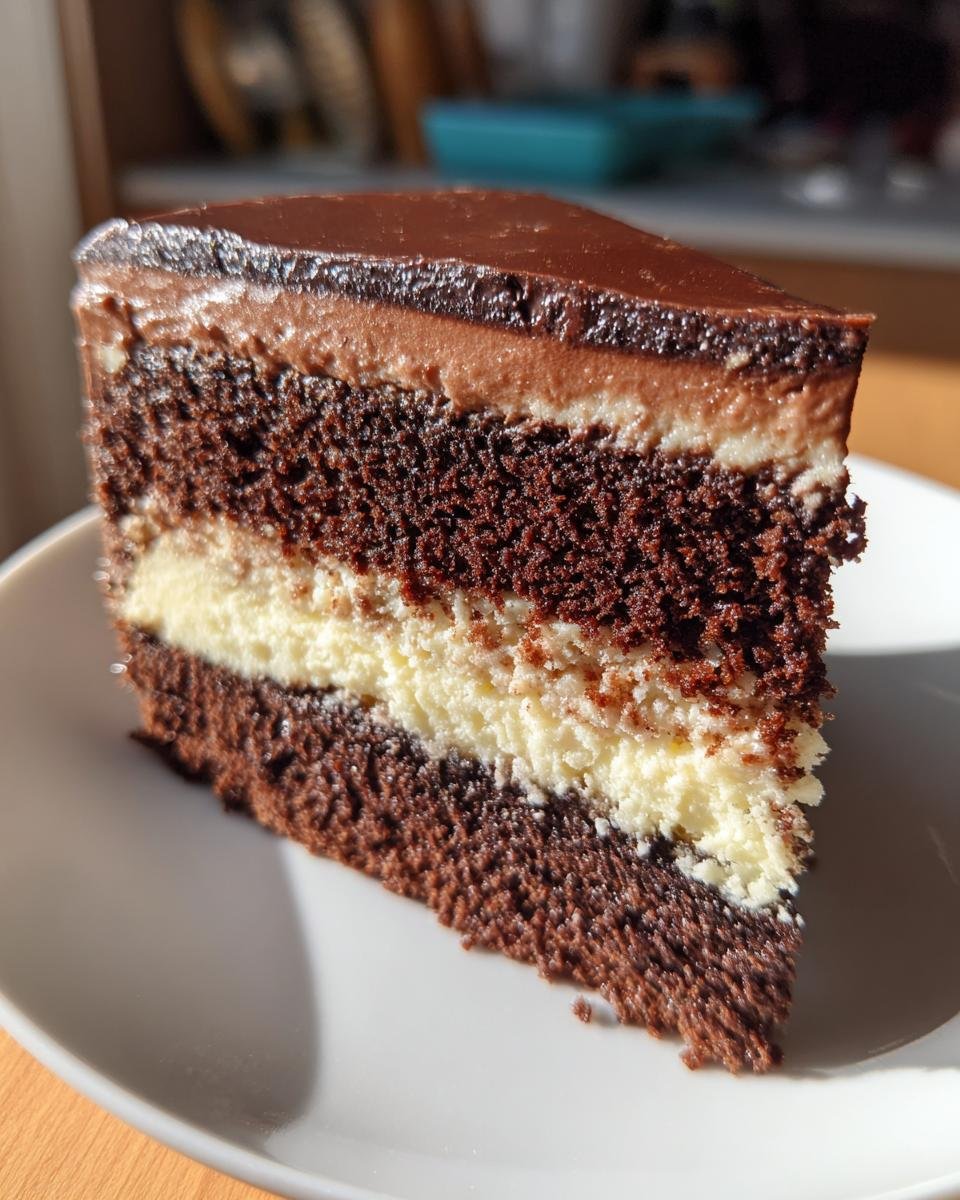
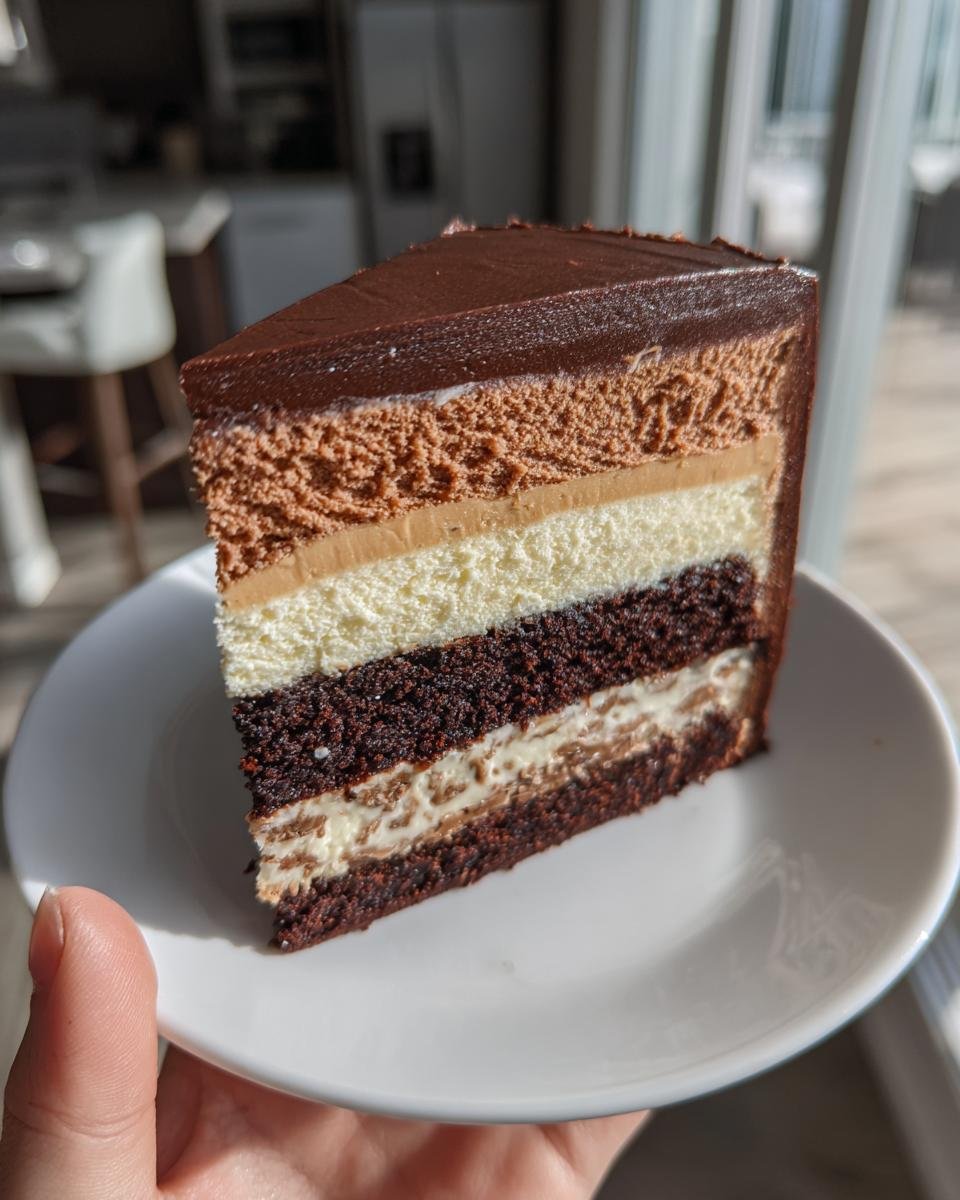
Every bite of this cake is pure bliss. You get that moist, rich chocolate, then it gives way to the smooth, almost ethereal Kinderella filling. It’s sweet, but not *too* sweet, with just the right amount of creamy texture to make you close your eyes and savor every single mouthful. It’s truly a sensory delight!
Essential Ingredients for Sublime Chocolate Kinder Cakes
Alright, let’s talk ingredients! Just like with any masterpiece, the quality of your materials really matters here. Don’t skimp on these, because they’re what make this Chocolate Kinder Cake truly sing. We’re looking for fresh, good-quality stuff. Trust me, it makes all the difference in that final glorious bite!
For the decadent chocolate sponge, you’ll need 200g of unsalted butter, softened (this is super important for creaming properly!), 200g of caster sugar, 4 large eggs, 150g of self-raising flour, 50g of good cocoa powder, a tiny teaspoon of baking powder, and 4 tablespoons of milk.
Now, for that dreamy Kinderella filling, grab 200g of Kinderella spread (yes, it exists and it’s amazing!), 100g of softened cream cheese, 50g of icing sugar, and 100ml of luscious double cream. And for the smooth chocolate ganache, you’ll want 200g of dark chocolate (chopped, so it melts nicely) and another 100ml of double cream. Last but not least, an assortment of your favorite Kinder chocolates – think Kinder Bueno, Kinder Surprise, and Kinder Chocolate bars – for decorating. Yum!
Gathering Your Supplies for Perfect Chocolate Kinder Cakes
Before you even think about cracking an egg, make sure you’ve got everything ready to go! Accuracy is key in baking, so pull out your kitchen scales and measuring spoons. You want that butter nice and soft, the eggs at room temp, and your dark chocolate chopped up finely. Having everything prepped before you start mixing means a smoother, happier baking process. It takes a little extra time upfront, but it saves so much hassle later, promise!
Step-by-Step Guide to Crafting Chocolate Kinder Cakes
Okay, now for the fun part: making this beautiful cake come to life! Don’t be intimidated; I’m going to walk you through every single step, just like I’d show a friend in my own kitchen. Remember, baking is about love and a little bit of science, so let’s get precise but also have fun with it!
First things first, preheat your oven to 180°C (that’s 160°C fan or 350°F). While it’s warming up, get your two 20cm (8-inch) round cake tins ready. Grease them really well, then line the bottoms with baking paper. This is key for easy release – nobody wants a stuck cake!
Baking the Perfect Sponge for Your Chocolate Kinder Cakes
Let’s get those sponges going! In a large bowl, cream together your softened butter and caster sugar until it’s super light and fluffy. This is where all those tiny air pockets form, giving your cake a lovely texture. Next, beat in your eggs one at a time, making sure each one is fully incorporated before adding the next. Don’t rush this part! Then, sift in your flour, cocoa powder, and baking powder. Gently fold it all together. And I mean *gentle*! Overmixing is the enemy of a tender cake. Finally, stir in the milk until everything is just combined – a few streaks of flour are totally fine.
Divide that gorgeous batter evenly between your two prepared tins. Pop them in the oven for about 25-30 minutes. You’ll know they’re done when a skewer inserted into the center comes out clean. Let them cool in the tins for a bit, maybe 10 minutes, then carefully turn them out onto a wire rack to cool completely. Patience is a virtue here!
Creating the Creamy Kinderella Filling for Chocolate Kinder Cakes
While your cake layers are cooling, let’s whip up that dreamy Kinderella filling! In a bowl, beat together the Kinderella spread, softened cream cheese, and icing sugar until it’s wonderfully smooth. In a separate, clean bowl, whip your double cream until it forms soft peaks. Now, here’s the important bit: gently, *gently* fold the whipped cream into the Kinderella mixture. We want to keep all that beautiful airiness, so no aggressive stirring, okay? Just fold until it’s combined and looks absolutely irresistible.
Assembling and Finishing Your Chocolate Kinder Cakes
Once your cake layers are completely cool (and I mean *completely* – warm cake will melt your filling!), you might need to level the tops with a serrated knife if they’ve domed a bit. Place one sponge on your serving plate or cake stand. Spread half of that amazing Kinderella filling evenly over it. Then, carefully place the second sponge on top and spread the remaining filling. Looking good already, right?
Now for the ganache! Chop your dark chocolate and put it in a heatproof bowl. Heat the double cream in a small saucepan until it just starts to simmer – you’ll see tiny bubbles around the edge. Pour the hot cream over the chocolate and let it sit for about 5 minutes. Don’t touch it! Then, stir it gently until it’s smooth and glossy. Let it cool down a little, stirring occasionally, until it thickens to a pourable consistency. You want it thick enough to coat, but still runny enough to drip. Pour that lovely ganache over the top of the cake, letting it drip down the sides for a beautiful effect. Finally, arrange your favorite Kinder chocolates all over the top. Pop it in the fridge for at least 30 minutes to set. And then… enjoy the masterpiece you’ve created!
Tips for Success with Your Chocolate Kinder Cakes
Alright, my friends, I’ve got a few golden rules that’ll help you nail this Chocolate Kinder Cake every single time. These are the little secrets that separate a good cake from an absolutely *amazing* one. First up, and I can’t stress this enough: make sure ALL your ingredients are at room temperature. Seriously, butter, eggs, cream cheese – everything. It helps them combine so much better, giving you that smooth, even batter we’re after.
Also, when you’re mixing the cake batter, don’t overdo it! Mix until just combined. Overmixing develops the gluten in the flour, making your cake tough, and we want a tender, melt-in-your-mouth crumb. And finally, when it comes to the ganache, be patient! Let it cool and thicken slightly before you pour it. This gives you those beautiful, controlled drips, and stops it from just running straight off the cake. Trust me on these little things!
Achieving Excellence in Chocolate Kinder Cakes
Remember that gentle folding of the whipped cream into the Kinderella filling? That’s key for an airy, luscious texture. And don’t rush the cooling process for your cake layers; warm cake plus cold filling equals a melted mess. Take your time, and you’ll be rewarded with a truly stunning and delicious Chocolate Kinder Cake!
Common Questions About Chocolate Kinder Cakes
I get a lot of questions when I share this Chocolate Kinder Cake recipe, and I totally get it! It’s a showstopper, and you want to make sure you get it just right. So, I’ve rounded up some of the most common things people ask me. Hopefully, these answers will give you even more confidence to bake your own amazing Chocolate Kinder Cake!
Can I Make Chocolate Kinder Cakes Ahead of Time?
Absolutely! This Chocolate Kinder Cake actually tastes even better the next day once all those flavors have had a chance to meld together. You can bake the sponges a day or two in advance, wrap them tightly, and store them at room temperature. The filling and ganache can also be made ahead and stored in the fridge, then assembled on the day you plan to serve.
How Should I Store My Chocolate Kinder Cakes?
Because of the cream cheese in the filling, you’ll want to store your baked Chocolate Kinder Cake in an airtight container in the refrigerator. It’ll stay fresh and delicious for up to 3 days. Just bring it out about 30 minutes before serving to let it come closer to room temperature – it really brings out all those lovely flavors!
What If I Don’t Have Kinderella Spread for My Chocolate Kinder Cakes?
Oh, this is a good one! While Kinderella spread really gives it that authentic Kinder taste, if you can’t find it, don’t fret. You could try using a good quality hazelnut spread (like Nutella) mixed with some extra white chocolate ganache to mimic the creamy, milky flavor. Or, for a simpler alternative, just use a plain cream cheese frosting and swirl in some melted white chocolate. It won’t be quite the same, but it’ll still be delicious!
Serving and Storing Your Chocolate Kinder Cakes
Okay, so your masterpiece is complete! Now for the best part: digging in! I always recommend letting this Chocolate Kinder Cake sit out of the fridge for about 15-30 minutes before you slice into it. This just takes the chill off, making the sponge softer and the ganache and filling perfectly creamy. It truly enhances all those lovely flavors. When you’re ready to serve, a sharp, warm knife makes for the cleanest slices – just wipe it clean between cuts. And trust me, you’ll want to savor every single bite of this beauty!
Keeping Your Chocolate Kinder Cakes Fresh
To keep your amazing Chocolate Kinder Cake tasting its best, pop any leftovers into an airtight container and store them in the refrigerator. Thanks to that creamy Kinderella filling, it needs to stay cool. It’ll stay wonderfully fresh and delicious for up to 3 days. Perfect for a little treat later!
Estimated Nutritional Information for Chocolate Kinder Cakes
Just a quick note on the good stuff inside! While I’m all about enjoying every delicious bite, I know some of you like to keep an eye on the numbers. So, for one slice of this glorious Chocolate Kinder Cake (assuming 12 servings), here’s a rough estimate:
- Calories: Around 550
- Fat: About 35g (20g saturated, 10g unsaturated, 0.5g trans)
- Carbohydrates: Approximately 60g
- Sugar: Roughly 55g
- Protein: Around 7g
- Fiber: About 3g
Please remember, these are just estimates! They can vary quite a bit depending on the exact brands you use for your ingredients and how big your slices are. But hey, it’s a treat, right? Enjoy it!
Share Your Chocolate Kinder Cakes Creation
Well, there you have it, my friends! Your very own, incredibly delicious Chocolate Kinder Cake. I absolutely *love* seeing what you create in your kitchens, so please, please, please don’t be shy! If you make this cake, snap a photo and share it with me on social media – you can tag me, or just leave a comment below and tell me how it went. Did you add extra Kinder Buenos? A different topping? I want to know all about it! Your baking adventures inspire me, and it’s so much fun to build this little community of sweet-toothed bakers together. Happy baking!
Print
Chocolate Kinder Cakes: 7 Slices of Pure Bliss!
- Total Time: 1 hour 15 minutes
- Yield: 12 servings 1x
- Diet: Vegetarian
Description
This recipe guides you through creating a delightful Chocolate Kinder Cake, featuring layers of rich chocolate sponge, creamy Kinderella filling, and a smooth chocolate ganache, all adorned with your favorite Kinder chocolates. It’s an ideal dessert for celebrations or a special treat.
Ingredients
- 200g unsalted butter, softened
- 200g caster sugar
- 4 large eggs
- 150g self-raising flour
- 50g cocoa powder
- 1 tsp baking powder
- 4 tbsp milk
- 200g Kinderella spread
- 100g cream cheese, softened
- 50g icing sugar
- 100ml double cream
- 200g dark chocolate
- 100ml double cream (for ganache)
- Assorted Kinder chocolates (Kinder Bueno, Kinder Surprise, Kinder Chocolate bars) for decoration
Instructions
- Preheat your oven to 180°C (160°C fan/350°F). Grease and line two 20cm (8-inch) round cake tins.
- For the sponge, cream together the butter and caster sugar until light and fluffy. Beat in the eggs one at a time.
- Sift in the flour, cocoa powder, and baking powder. Fold gently, then stir in the milk until just combined.
- Divide the mixture evenly between the two prepared tins. Bake for 25-30 minutes, or until a skewer inserted into the center comes out clean. Let cool in the tins for 10 minutes before transferring to a wire rack to cool completely.
- For the Kinderella filling, beat the Kinderella spread, cream cheese, and icing sugar together until smooth. In a separate bowl, whip the double cream until soft peaks form. Gently fold the whipped cream into the Kinderella mixture.
- Once the cakes are completely cool, level the tops if necessary. Place one sponge on a serving plate. Spread half of the Kinderella filling over it. Top with the second sponge and spread the remaining filling.
- For the chocolate ganache, chop the dark chocolate and place it in a heatproof bowl. Heat the double cream in a small saucepan until it just begins to simmer. Pour the hot cream over the chocolate. Let it sit for 5 minutes, then stir until smooth and glossy. Let the ganache cool slightly until it thickens to a pourable consistency.
- Pour the ganache over the top of the cake, allowing it to drip down the sides.
- Decorate with assorted Kinder chocolates as desired. Chill for at least 30 minutes before serving.
Notes
- Ensure all ingredients are at room temperature for best results.
- Do not overmix the cake batter; mix until just combined.
- For a neater ganache drip, use a spoon to guide the ganache around the edges of the cake.
- Store the cake in an airtight container in the refrigerator for up to 3 days.
- Prep Time: 45 minutes
- Cook Time: 30 minutes
- Category: Dessert
- Method: Baking
- Cuisine: European
Nutrition
- Serving Size: 1 slice
- Calories: 550
- Sugar: 55g
- Sodium: 120mg
- Fat: 35g
- Saturated Fat: 20g
- Unsaturated Fat: 10g
- Trans Fat: 0.5g
- Carbohydrates: 60g
- Fiber: 3g
- Protein: 7g
- Cholesterol: 100mg
Keywords: chocolate cake, Kinder, dessert, baking, celebration cake, treat