
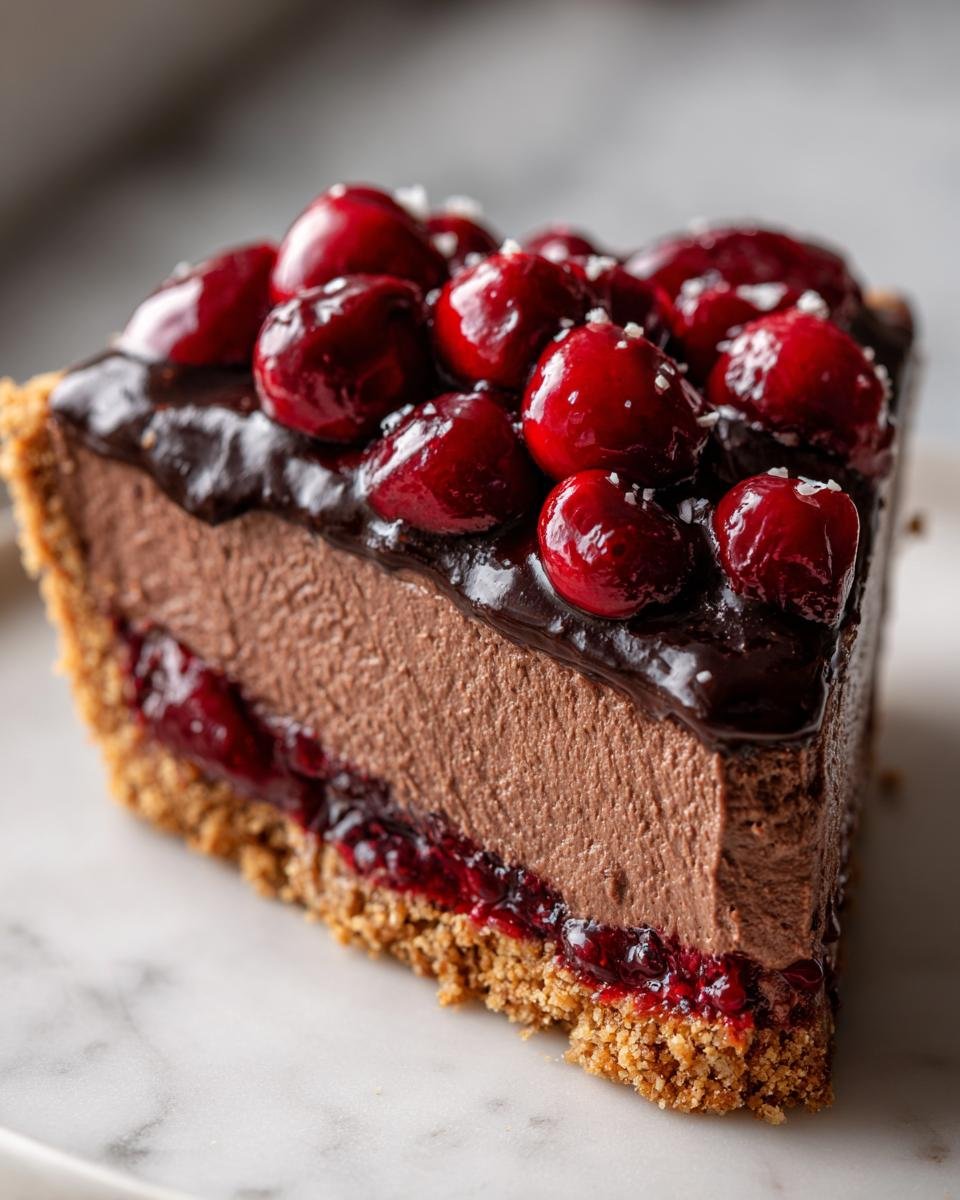
Oh, I just love those desserts that look like they took all day but secretly come together in a flash! If you’re like me and crave something seriously rich but don’t want to turn on the oven when it’s already hot outside, you absolutely need this recipe. We are talking about the most decadent, no-bake wonder: the Chocolate Cherry Cream Pie. Honestly, when I first tried to nail this recipe, I made a massive mess, but the payoff was this incredible marriage of dark, creamy chocolate, fluffy lightness, and those bright, tart bursts from the cherry pie filling. It’s pure indulgence, and once you see how easy it is, you’ll be making this all the time. If you’ve ever struggled with watery fillings like some of the pies I’ve seen that just don’t set, don’t worry, this one sets up beautifully! Trust me, this pie is sunshine in a graham cracker crust!
Gathering Ingredients for Your Chocolate Cherry Cream Pie
Alright, before we even think about mixing, we need to gather our troops! The secret here is making sure everything is ready to go. Since this is a no-bake situation, the temperature of your ingredients matters hugely for a smooth finish. Don’t grab your cream cheese straight from the fridge; it absolutely has to be soft! You’ll find my favorite cream preparations detailed in the fillings guide here, but for this pie, here’s what we need:
- One 9-inch graham cracker crust. If you decide to make your own, make sure it’s pre-pressed firmly!
- 1 cup of heavy cream (must be very cold before whipping).
- 8 ounces of cream cheese, softened completely to room temperature.
- 1/2 cup of powdered sugar, sifted if it’s clumpy.
- 1 teaspoon of vanilla extract—use the good stuff, please!
- 1/4 cup of cocoa powder, sifted to avoid little chocolate rocks in your filling.
- One 21-ounce can of cherry pie filling.
- If you want that final flourish, grab 1/2 cup of whipped topping for garnish later.
Essential Equipment for the Perfect Chocolate Cherry Cream Pie
Okay, you don’t need a huge professional setup for this creamy dream, but you do need the right tools to get that airy texture we’re aiming for. Skipping an important piece of gear will definitely make your arm tired or ruin the fluff factor! Think of this as your required gear list for dessert success.
First up, you really, really need an electric mixer. I use my stand mixer, but a hand mixer works wonderfully too. You’ll need it for whipping that heavy cream into stiff clouds, and then for beating the cream cheese until it’s velvety smooth. Trust me on this one; trying to whip that much cream cheese by hand is just asking for trouble!
You’ll also need a couple of good bowls. One large one for the heavy cream—and listen, if you can, pop that bowl and the beaters into the freezer for 15 minutes before you start. It makes all the difference! Then you need a medium bowl for handling the cream cheese mixture.
Don’t forget the basics after whipping: we need a flexible rubber spatula for gently folding the air into the chocolate mixture—remember, we don’t want to deflate all those lovely tiny air bubbles! And of course, you need that 9-inch pie dish ready to go since this whole assembly process moves pretty fast once the fillings are mixed.
- Electric or stand mixer with whisk/paddle attachment
- Large bowl (chilled is best!)
- Medium mixing bowl
- Rubber spatula
- Measuring cups and spoons
- Sifter or fine-mesh sieve (for the cocoa powder)
- 9-inch pie plate
Get these things ready, and you’re halfway to chilling heaven!
Step-by-Step Instructions to Make Chocolate Cherry Cream Pie
Now for the fun part! Since this is a no-bake dessert, we need to focus on technique to make sure everything sets up firm and airy. If you’re worried about getting that perfect homemade texture, remember my little trick: chilling everything beforehand is your secret weapon! You want a sturdy base for that amazing filling. If you want more ideas on setting up no-bake goodies, check out my eclair cake guide; the principles are similar.
Preparing the Whipped Cream Base
This step is all about creating volume! Take your heavy cream—and please remember that tip about chilling your bowl and beaters first, it seriously helps the cream whip up faster and stronger!—and beat it in a large bowl until you have really stiff peaks. You should be able to hold the bowl upside down (carefully, of course!) and the cream shouldn’t even budge. Set that beautiful cloud aside for now. Don’t touch it!
Creating the Rich Chocolate Cream Filling for the Chocolate Cherry Cream Pie
Next, we work on the flavor bomb! In a separate bowl, beat your softened cream cheese until it’s completely smooth—no lumps allowed! You have to get it silky smooth before adding the sugar and vanilla extract. Once that’s creamy, slowly beat in the powdered sugar and vanilla. Now, sift that ¼ cup of cocoa powder right over the top and beat until it’s rich, beautifully colored, and totally lump-free. This is where the magic starts to look like a decadent Chocolate Cherry Cream Pie filling. The final move here is crucial: gently fold in your reserved whipped cream. And I mean gently. We fold it in just until there are no white streaks left—overmixing here is how you lose all that lovely air!
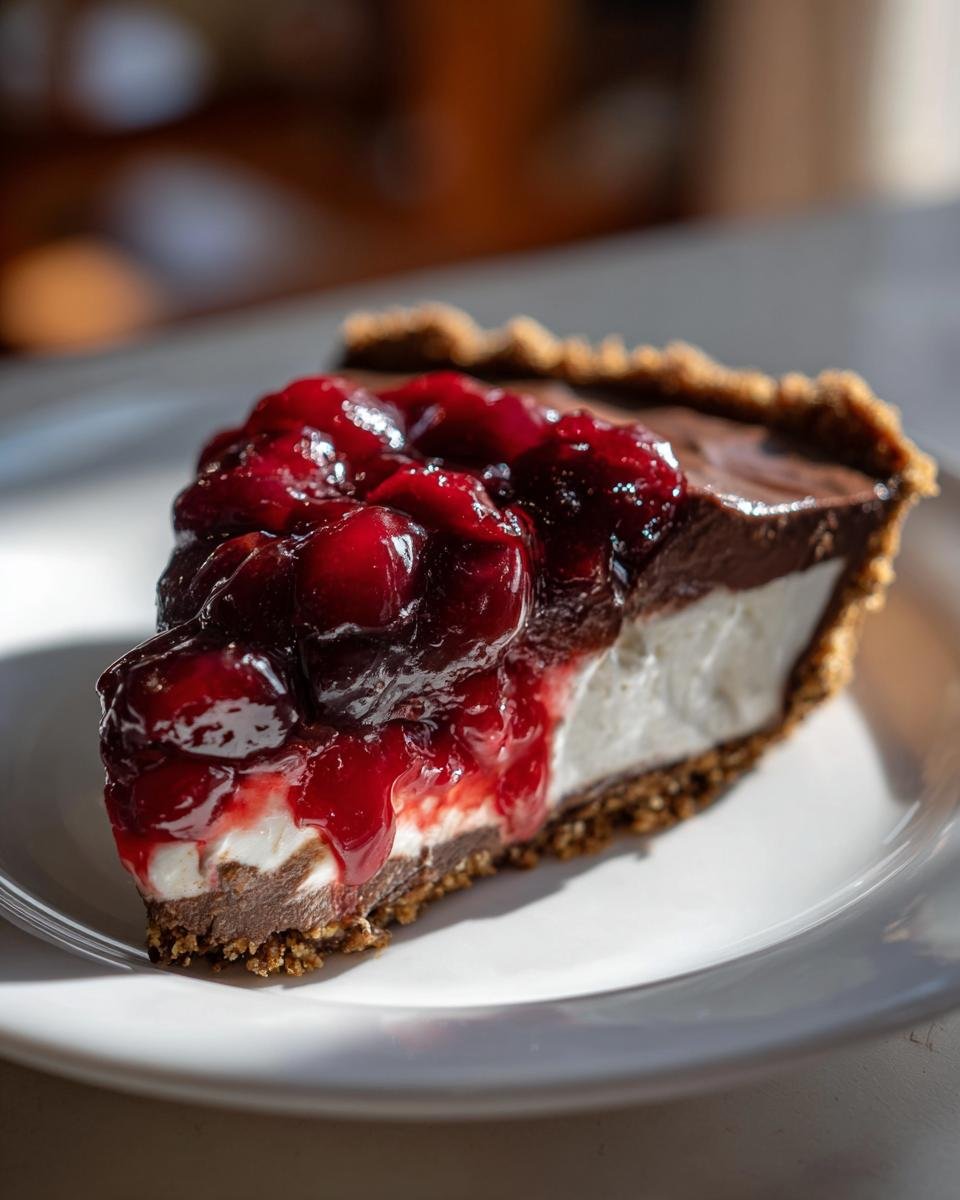
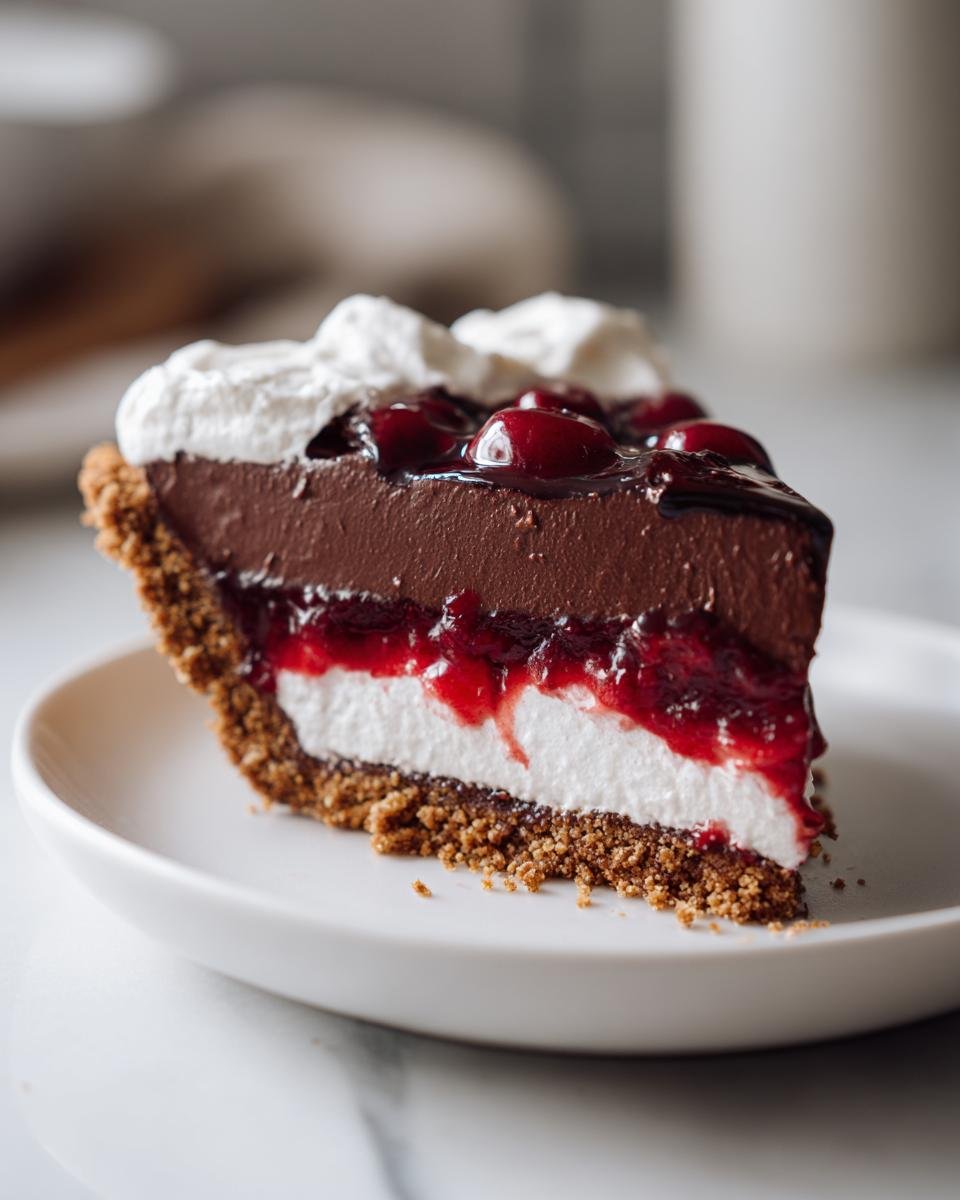
Assembling and Chilling Your Chocolate Cherry Cream Pie
Time to layer this beauty! Spread about half of that gorgeous chocolate cream mixture right into the bottom of your graham cracker crust. Pat it down slightly so it’s a nice, even layer. Now comes the cherry explosion! Take that whole can of cherry pie filling and spoon it right over the chocolate layer. Try to spread it gently so you don’t disturb the base too much. Then, delicately spoon the rest of the chocolate cream mixture over the top, making sure you cover all those gorgeous cherries right to the edges. Finally, the hardest part: the waiting game. Your Chocolate Cherry Cream Pie needs to chill in the fridge for at least four hours, or until it’s completely firm to the touch. If you slice it early, folks, you’ll just have chocolate cherry soup!

Tips for the Best Chocolate Cherry Cream Pie Texture
Texture, texture, texture! That’s what separates an okay no-bake pie from one that makes people ask for the recipe before they even finish their first slice. For Chocolate Cherry Cream Pie, we are aiming for rich, cloud-like filling that holds its shape beautifully, right down to the last bite. It really all comes down to a couple of critical moments during the mixing process.
My biggest textural fail early on was thinking I could rush the cream cheese. If your cream cheese is still cold or even slightly firm when you start beating it, you are guaranteed to end up with little lumps, no matter how much powdered sugar you add later! Make sure it’s truly soft—it should give easily when pressed with a gentle finger. Beat it until it looks like fluffy frosting *before* you add any sugar or cocoa. That’s your insurance policy against lumpiness!
The second texture trap, which I mentioned before but it’s worth repeating, is folding in that gorgeous whipped cream. When you fold, you are using the spatula to gently incorporate the lighter ingredient into the heavier one, cutting down the middle and sweeping up the sides. If you switch to mixing or beating, you are going to deflate all the air we worked so hard to incorporate into the heavy cream. That air is what keeps this pie from turning into a dense brick! Stop folding the second you see no major white streaks. It’s way better to have a tiny, tiny bit of unincorporated cream than to knock all the fluff out. Seriously, slow down for that last minute of mixing; your texture will thank you for it when it comes time to slice!
Ingredient Notes and Substitutions for Chocolate Cherry Cream Pie
Let’s talk about making smart swaps because, let’s be honest, sometimes the pantry doesn’t cooperate! While the recipe calls for a pre-made graham cracker crust to keep things simple—a total weeknight hero move, by the way—you absolutely have the option to make it yourself. If you do, just mix about 1 ½ cups of graham cracker crumbs with ¼ cup of melted butter and 2 tablespoons of sugar, press it firmly into the pie plate, and chill it while you make the filling. It works just as well, though it adds a few steps!
Now, for the real ingredients: the cocoa powder and the cherries. If you happen to only have natural, unsweetened cocoa powder instead of the Dutch-process type (though regular works fine here!), you might notice a slight flavor difference, but it’s not a deal-breaker. If you’re out of cocoa powder completely, you could try using a good quality packet of hot chocolate mix in a pinch, but cut back on the powdered sugar a bit since the mix is already sweetened. You may want to check out how others have adapted recipes using different pantry staples, like in some of the flavor profiles discussed in this guide, to see what might work for you!
As for the cherry filling? A can of cherry pie filling is standard, but if you have tons of fresh or frozen cherries sitting around, go for it! You’d need about 3 cups of fruit, simmered gently with a bit of cornstarch and sugar until it thickens up nicely before it gets layered into the pie. Just let that homemade cherry mixture cool completely—and I mean completely—before using it, or it will melt your beautiful chocolate cream layer right into a puddle!
Serving Suggestions for Your Chocolate Cherry Cream Pie
The pie is chilling, the anticipation is building, and now we talk about the grand finale: presentation! Remember, this is a rich dessert, so you don’t need much fanfare, but a little garnish shows you care. If you opted to save that ½ cup of whipped topping, now is the time to shine. We aren’t making stiff peaks here; we just want soft, pillowy dollops scattered artfully over the top before we slice into it.
If you skipped the store-bought topping, don’t sweat it! Dusting the top gently with extra sifted cocoa powder is fantastic. It gives it a beautiful matte finish that contrasts perfectly with the shiny cherries peeking out from the sides. Or, if you want a little textural crunch in every slice, grate a small amount of good quality dark or semi-sweet chocolate right over the top. You can use a cheese grater on the cold chocolate bar for lovely shavings.
What about what you serve with it? Since this pie is already so loaded with cream and chocolate, fancy sauces aren’t really necessary. In fact, I think simple is best. A tiny swirl of raspberry sauce on the plate, letting the pie sit right in the middle, looks elegant. Or, if you’re serving it after a big meal, skip the sides! This pie is fantastic by itself, perhaps served alongside a strong black coffee or an espresso shot. If you’re interested in other great ways to present individual desserts, I found some fun single-serving ideas over here that might inspire you for future no-bake treats!
The main goal is to let that beautiful contrast between the dark chocolate and the bright red cherries do most of the talking. It looks stunning just sitting there, waiting for the fork!
Storage and Make-Ahead Options for Chocolate Cherry Cream Pie
One of the best things about a no-bake cream pie like this is that it’s actually designed to be made ahead of time! That’s why this Chocolate Cherry Cream Pie is my secret weapon for holiday dinners or busy weekends. It actually needs time to chill so everything firms up, so planning ahead is your friend here.
You must cover the pie tightly before popping it into the refrigerator. Plastic wrap is fine, but make absolutely sure it isn’t sticking to the whipped topping or any exposed chocolate, or you’ll end up with a messy top layer when you pull the plastic off. If you’re using whipped topping on top, I wouldn’t put that on until about an hour before serving, otherwise, it tends to weep a little in the cooler environment.
How long can it hang out in there? Generally, this pie is fantastic when served within 24 hours of assembly. It maintains its freshest whipped texture for about two days. After that, the graham cracker crust starts to absorb moisture from the filling, and while it’s still perfectly safe to eat, the crust gets a little soft, which isn’t my favorite. If you want to get a head start, you can always make a homemade crust a day ahead, keep it covered, and then mix up the filling the day before you plan to serve the pie.
I’ve even looked into freezing some of these types of creamy, no-bake desserts, and while some people have success with keto versions like the ones found here, I really don’t recommend freezing this one. The heavy cream and cream cheese filling don’t like being frozen and thawed; they tend to separate a bit, resulting in a weepy, watery mess when they defrost. So, stick to the fridge for stellar texture!
Plan to assemble this completely the day before your party. It buys you time and guarantees a beautifully set pie that slices like a dream!
Frequently Asked Questions About Making Chocolate Cherry Cream Pie
It’s always the last-minute worries that pop up, isn’t it? Whenever I bring this pie to a gathering, people always have questions about making sure their version turns out just as perfect. This no bake dessert is generally super straightforward, but sometimes little details trip folks up. Here are the things I hear most often when people are digging into making this chocolate and cherry masterpiece!
Can I use a homemade graham cracker crust instead of pre-made for this Chocolate Cherry Cream Pie?
Absolutely, yes! While the pre-made one is my go-to when I’m strapped for time, making your own crust lets you control the flavor and sweetness. You just need crumbs, melted butter, and maybe a touch of sugar mixed really well. You press that mixture firmly into the bottom and up the sides of your pie plate. Since this is a cream pie filling that gets quite sturdy when chilled, you don’t actually have to bake the homemade crust ahead of time! Just make sure it’s really well-pressed and give it a solid 20 minutes in the fridge while you mix your filling components. That chilling time helps bind it so it doesn’t fall apart when you go to scoop out that first slice of Chocolate Cherry Cream Pie.
How long does the Chocolate Cherry Cream Pie need to chill?
This is probably the most important question because this pie relies 100% on cold time to set up properly! You need a minimum of four hours once you have fully assembled the layers. If you try to slice it sooner, that lovely mixture of cream cheese and whipped cream won’t have solidified enough, and you risk having a gooey center, no matter how perfectly you folded everything. I like to give it closer to six hours, or even chill it overnight if I can manage it. The longer it chills, the more beautifully clean your slices will be, which is always satisfying!
What is the best way to slice this no-bake cream pie?
Oh, slicing cream pies can be tricky because the filling is so soft! You definitely want a clean, beautiful wedge to show off those layers, right? Here is my favorite trick: grab a very sharp knife and dip the blade completely into a mug of hot water. Wipe the blade completely dry with a paper towel—it needs to be dry, otherwise, that water will mess with your layers—and then slice your first piece. That heat melts just enough of the cream surface to let the knife glide through cleanly.
After you make your cut, dip the knife back into the hot water, wipe it clean again, and then cut the next slice. You keep repeating this cleaning process for every single slice. It sounds tedious, but seriously, watching someone try to cut a cream pie with a standard room-temperature knife is just painful! If you want more tips on handling no-bake layers, you know I talk about a few tricky setups for things like cannoli cream pie over there, too!
Estimated Nutritional Breakdown of Chocolate Cherry Cream Pie
Listen, I’m a cook, not a nutritionist, so please take these numbers with a grain of salt! Since we are dealing with heavy cream, cream cheese, and sugary fillings, this is definitely a treat, not an everyday snack. But knowing what you’re dealing with is helpful planning, especially when serving guests! These estimates are based on splitting the pie into 8 even slices using standard ingredient formulations, but if you use reduced-fat cream cheese or a sugar substitute, your numbers will change!
For one slice of this decadent Chocolate Cherry Cream Pie, here’s what you’re probably looking at:
- Calories: Around 350 calories
- Fat: Roughly 20 grams (about 12g of that is saturated fat)
- Carbohydrates: Around 40 grams
- Sugar: This one runs high, usually around 35 grams, mostly from the pie filling and powdered sugar.
- Protein: About 4 grams
- Sodium: Around 250 mg
It’s rich, it’s sweet, and it’s worth every single bite on a special occasion, especially since it packs so much flavor thanks to the chocolate and the cherries!
Estimated Nutritional Breakdown of Chocolate Cherry Cream Pie
Listen, I’m a cook, not a nutritionist, so please take these numbers with a grain of salt! Since we are dealing with heavy cream, cream cheese, and sugary fillings, this is definitely a treat, not an everyday snack. But knowing what you’re dealing with is helpful planning, especially when serving guests! These estimates are based on splitting the pie into 8 even slices using standard ingredient formulations, but if you use reduced-fat cream cheese or a sugar substitute, your numbers will change!
For one slice of this decadent Chocolate Cherry Cream Pie, here’s what you’re probably looking at:
- Calories: Around 350 calories
- Fat: Roughly 20 grams (about 12g of that is saturated fat)
- Carbohydrates: Around 40 grams
- Sugar: This one runs high, usually around 35 grams, mostly from the pie filling and powdered sugar.
- Protein: About 4 grams
- Sodium: Around 250 mg
It’s rich, it’s sweet, and it’s worth every single bite on a special occasion, especially since it packs so much flavor thanks to the chocolate and the cherries! If you want to dive deeper into the actual sugar content in various fruits and how that plays into desserts, you can read my deep dive right here!
Print
Chocolate Cherry Cream Pie
- Total Time: 25 min
- Yield: 8 servings 1x
- Diet: Vegetarian
Description
A rich cream pie featuring chocolate and cherry flavors.
Ingredients
- 1 pre-made graham cracker crust (9 inch)
- 1 cup heavy cream
- 8 ounces cream cheese, softened
- 1/2 cup powdered sugar
- 1 teaspoon vanilla extract
- 1/4 cup cocoa powder
- 1 (21 ounce) can cherry pie filling
- 1/2 cup whipped topping (optional, for garnish)
Instructions
- Beat the heavy cream in a large bowl until stiff peaks form. Set aside.
- In a separate bowl, beat the softened cream cheese until smooth.
- Gradually beat in the powdered sugar and vanilla extract into the cream cheese mixture.
- Sift the cocoa powder over the cream cheese mixture and beat until fully combined and smooth.
- Gently fold the whipped cream into the chocolate cream cheese mixture until just combined. Do not overmix.
- Spread half of the chocolate cream mixture into the bottom of the graham cracker crust.
- Spoon the entire can of cherry pie filling evenly over the chocolate layer.
- Top with the remaining chocolate cream mixture, spreading it to cover the cherries.
- Chill the pie for at least 4 hours, or until firm.
- Garnish with whipped topping before serving, if desired.
Notes
- You can make your own graham cracker crust if you prefer.
- Chill the mixing bowl and beaters before whipping the heavy cream for best results.
- Prep Time: 25 min
- Cook Time: 0 min
- Category: Dessert
- Method: No Bake
- Cuisine: American
Nutrition
- Serving Size: 1 slice
- Calories: 350
- Sugar: 35
- Sodium: 250
- Fat: 20
- Saturated Fat: 12
- Unsaturated Fat: 8
- Trans Fat: 0
- Carbohydrates: 40
- Fiber: 1
- Protein: 4
- Cholesterol: 50
Keywords: chocolate, cherry, cream pie, no bake, graham cracker crust, dessert