
Okay, gather ’round, because I’m about to share something really special with you! There’s just something magical about vintage desserts, isn’t there? They transport you back to a simpler time, full of warmth and comfort. And when it comes to classic comfort, nothing beats My Grammas Best Vintage Dessert Recipes. These aren’t just recipes; they’re little pieces of edible history, passed down through generations, full of love and memories.
My Gramma, bless her heart, was a kitchen wizard. Her hands, dusted with flour and smelling faintly of vanilla, could turn the simplest ingredients into pure joy. Every Sunday, her kitchen was buzzing, and the air was thick with the most incredible smells. This particular recipe, a true gem from her collection, is one I hold so dear. It’s not fancy, it doesn’t require any weird ingredients, but oh my goodness, the flavor is just *perfect*. It’s the kind of cake that makes you close your eyes and just sigh with happiness.
It’s got this wonderful, tender crumb and a classic flavor that just feels like coming home. It’s proof that sometimes, the most simple things are truly the best. Trust me, once you try this, you’ll understand why these are My Grammas Best Vintage Dessert Recipes. Let’s get baking!

Why You’ll Love These My Grammas Best Vintage Dessert Recipes
Seriously, there are so many reasons to fall head-over-heels for this recipe! It’s more than just a cake; it’s an experience. Here’s why you’re going to absolutely adore making and eating My Grammas Best Vintage Dessert Recipes:
- It’s SO Easy: Don’t be intimidated! This recipe is super straightforward. No fancy techniques needed, just good old-fashioned mixing and baking. Perfect for beginners or when you just want something simple and delicious.
- Pure Comfort Flavor: This cake has that classic, warm, sweet taste that just feels like a hug. It’s not overly complicated, just pure, straightforward deliciousness that everyone loves.
- Hello, Nostalgia! Every bite takes you back. Whether it reminds you of your own grandma, a school bake sale, or just a simpler time, it’s packed with feel-good memories.
- Perfect for ANYTHING: Seriously, this cake fits every occasion. Weeknight treat? Yep. Potluck? Absolutely. Birthday party? You bet. It’s a crowd-pleaser, always.

Gather Your Ingredients for My Grammas Best Vintage Dessert Recipes
Alright, let’s get our ducks in a row! Gramma always said half the battle is having everything ready. Here’s what you’ll need for this little slice of heaven, all laid out nice and clear:
- 1 cup all-purpose flour (just your basic white flour is perfect!)
- 1/2 cup granulated sugar (the regular white stuff)
- 1/4 cup unsalted butter, softened (make sure it’s nice and soft, but not melty!)
- 1 large egg (room temperature if you can manage it, but don’t stress too much)
- 1 teaspoon vanilla extract (the good stuff!)
- 1/2 teaspoon baking powder (check the date on this, it makes a difference!)
- 1/4 teaspoon salt (just a pinch to balance everything out)
- 1/2 cup milk (whole milk is lovely here, but whatever you have is fine)
Essential Equipment for My Grammas Best Vintage Dessert Recipes
You don’t need a fancy kitchen full of gadgets for this one, which is another thing I love about vintage recipes! Just a few basics will do the trick. Here’s what you’ll want to have handy:
- Mixing bowls (you’ll need at least two!)
- A whisk or fork for the dry ingredients
- A sturdy spoon or rubber spatula for mixing
- Measuring cups and spoons
- A baking pan (check the recipe notes for size, but a standard square or loaf pan works great)
Step-by-Step Guide to My Grammas Best Vintage Dessert Recipes
Okay, deep breath! We’re going to walk through this together, just like Gramma showed me. It’s super simple, I promise. Follow these steps, and you’ll have a delicious piece of vintage goodness in no time. Let’s bake!
- Get the Oven Ready: First things first, preheat your oven to 350°F (that’s 175°C). While it’s heating up, grab your baking pan. Gramma always used butter and a little flour to coat the inside, making sure the cake wouldn’t stick. Get into all the corners!
- Cream the Butter and Sugar: In your biggest mixing bowl, put that softened butter and the granulated sugar. Now, grab your spoon or a mixer if you’re feeling modern, and beat them together until they’re light and fluffy. It should look pale yellow and airy. This is where you’re building the base for that lovely texture!
- Add the Wet Goodness: Next, crack in that large egg and pour in the vanilla extract. Beat them into the butter and sugar mixture until everything is well combined. Don’t worry if it looks a little separated at first, just keep mixing until it comes together smoothly.
- Whisk the Dry Stuff: In your separate bowl, whisk together the flour, baking powder, and salt. Give it a good mix to make sure the baking powder and salt are evenly distributed throughout the flour. This helps the cake rise evenly.
- Combine Wet and Dry, Carefully!: Now for the key part! You’re going to add the dry ingredients to the wet ingredients, but not all at once! Gramma always said to alternate with the milk. So, add about a third of the dry ingredients, mix gently until just combined (don’t overmix!), then add about half the milk, mix again, then another third of the dry, the rest of the milk, and finally the last of the dry ingredients. Always start and end with the dry! Mix until you don’t see any dry streaks of flour, but stop as soon as it’s combined. Overmixing can make your cake tough.
- Into the Pan It Goes: Pour that beautiful batter into your prepared baking pan. Use your spatula to scrape every last bit out of the bowl – no waste allowed! Smooth the top out a little bit.
- Bake Away!: Pop the pan into your preheated oven. Now, the baking time is usually around 30-35 minutes, but every oven is a little different! Start checking around the 30-minute mark. You’ll know it’s done when a toothpick inserted into the very center comes out clean, maybe with a few moist crumbs clinging to it, but no wet batter.
- Cool Down: Once it’s baked, take the cake out of the oven and let it cool in the pan for about 10 minutes. This is important! It lets the cake firm up a bit before you try to move it. After 10 minutes, carefully invert it onto a wire rack to cool completely. Patience is key here – don’t try to frost or serve it while it’s hot unless you want a crumbly mess!
Tips for Perfect My Grammas Best Vintage Dessert Recipes
Okay, you’re doing great! Now, just a few little pointers from Gramma’s kitchen to make sure your vintage dessert turns out absolutely perfect. These small things really do make a difference, trust me!
- Softened Butter is Key: Make sure your butter is truly soft, not melted! It should be able to leave an indent when you gently press it. This helps it cream properly with the sugar, creating air pockets that make the cake tender.
- Don’t Overmix: I know it’s tempting, but once you add the dry ingredients, mix *just* until everything is combined. Seeing a few small streaks of flour is totally fine! Overmixing develops gluten, which can lead to a tough cake.
- Trust Your Nose (and a Toothpick): Gramma always said the cake tells you when it’s done. You’ll start to smell that wonderful baked cake aroma filling your kitchen. Always double-check with a toothpick in the center – if it comes out clean, you’re golden!
- Patience with Cooling: Resist the urge to flip that cake out of the pan too soon! Letting it cool in the pan for 10 minutes lets it set up and makes it way easier to transfer without breaking.
Variations on These Vintage Dessert Recipes
One of the best things about a simple, classic recipe like this is how easy it is to make it your own! Gramma was a purist, but even she would appreciate a little bit of fun now and then. Here are a few easy ways to switch things up with these vintage dessert recipes:
- Add Some Zest: Stir in a teaspoon of fresh lemon or orange zest with the wet ingredients for a bright, citrusy lift. It pairs beautifully with the simple cake flavor.
- Chocolate Chip Delight: Who doesn’t love chocolate chips?! Fold in about half a cup of your favorite chocolate chips (milk, dark, or even white!) at the very end when you’re mixing in the dry ingredients.
- Spice it Up: For a warmer flavor, add a teaspoon of cinnamon, half a teaspoon of nutmeg, or a pinch of ground ginger to the dry ingredients. Perfect for fall baking!
- Nutty Goodness: If you like a little crunch, fold in about half a cup of chopped walnuts or pecans with the dry ingredients. Just make sure no one has allergies!

Serving and Storing My Grammas Best Vintage Dessert Recipes
Alright, your beautiful cake is cooled and ready! The simplest way to enjoy this vintage gem is just as it is, maybe with a dusting of powdered sugar like Gramma liked. A dollop of whipped cream or a scoop of vanilla ice cream is also never a bad idea! To keep any leftovers fresh, just pop them in an airtight container and they’ll be lovely at room temperature for up to 3 days. If you want to keep it longer, it freezes really well too!
Frequently Asked Questions About My Grammas Best Vintage Dessert Recipes
Got questions? Don’t worry, that’s totally normal! Here are a few things people often ask about these lovely vintage dessert recipes. Hopefully, this helps clear things up so you can bake with confidence!
- Q: Can I use a different size pan? A: Yes, you absolutely can! This recipe is pretty forgiving. A standard 8×8 square pan or even a loaf pan works great. Just keep an eye on the baking time, as it might change slightly depending on the pan size.
- Q: My cake seems a little dry, what did I do wrong? A: Oh no! A few things could cause that. Make sure you measured your flour correctly (don’t scoop right from the bag, spoon it into the measuring cup!). Also, be super careful not to overmix the batter, especially after adding the dry ingredients, and don’t overbake it!
- Q: Can I make this gluten-free? A: I haven’t personally tested this specific vintage dessert recipe with gluten-free flour, but generally, you can often substitute a good 1:1 gluten-free baking blend. You might need to adjust the liquid slightly, so keep an eye on the batter consistency.
- Q: What kind of milk is best? A: Gramma always used whole milk, and I think it gives the cake a lovely richness. But really, any milk you have on hand will work just fine!
Estimated Nutritional Information
Okay, for anyone keeping track, here’s a rough idea of what you’re looking at per serving for this classic vintage dessert. Remember, these are just estimates and can vary a bit based on your exact ingredients and how big you slice it! But generally, you can expect around 250 Calories, about 10g of Fat, 4g of Protein, and roughly 35g of Carbohydrates per slice. Enjoy in moderation, or don’t! It’s cake! 😉
Share Your Experience
Okay, now it’s your turn! I would absolutely LOVE to hear how this recipe for My Grammas Best Vintage Dessert Recipes turned out for you. Did you try any variations? Does it bring back memories for you too? Please leave a comment below, share your results, or rate the recipe! Your feedback is the sweetest thing (besides the cake!). Happy baking!
Print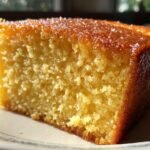
My Grammas Best Vintage Dessert Recipes 1 Sure Winner
- Total Time: 45 minutes
- Yield: 8 servings 1x
- Diet: Vegetarian
Description
A classic dessert recipe from grandma’s collection.
Ingredients
- 1 cup all-purpose flour
- 1/2 cup granulated sugar
- 1/4 cup unsalted butter, softened
- 1 large egg
- 1 teaspoon vanilla extract
- 1/2 teaspoon baking powder
- 1/4 teaspoon salt
- 1/2 cup milk
Instructions
- Preheat oven to 350°F (175°C). Grease and flour a baking pan.
- In a large bowl, cream together the softened butter and sugar until light and fluffy.
- Beat in the egg and vanilla extract.
- In a separate bowl, whisk together the flour, baking powder, and salt.
- Gradually add the dry ingredients to the wet ingredients, alternating with the milk, beginning and ending with the dry ingredients. Mix until just combined.
- Pour the batter into the prepared baking pan.
- Bake for 30-35 minutes, or until a toothpick inserted into the center comes out clean.
- Let cool in the pan for 10 minutes before transferring to a wire rack to cool completely.
Notes
- You can add your favorite frosting or glaze once the cake is cooled.
- Store leftovers in an airtight container at room temperature for up to 3 days.
- Prep Time: 15 minutes
- Cook Time: 30 minutes
- Category: Dessert
- Method: Baking
- Cuisine: American
Nutrition
- Serving Size: 1 slice
- Calories: 250
- Sugar: 20g
- Sodium: 150mg
- Fat: 10g
- Saturated Fat: 6g
- Unsaturated Fat: 3g
- Trans Fat: 0g
- Carbohydrates: 35g
- Fiber: 1g
- Protein: 4g
- Cholesterol: 40mg
Keywords: vintage dessert, grandma's recipes, classic dessert, easy dessert, cake recipe