
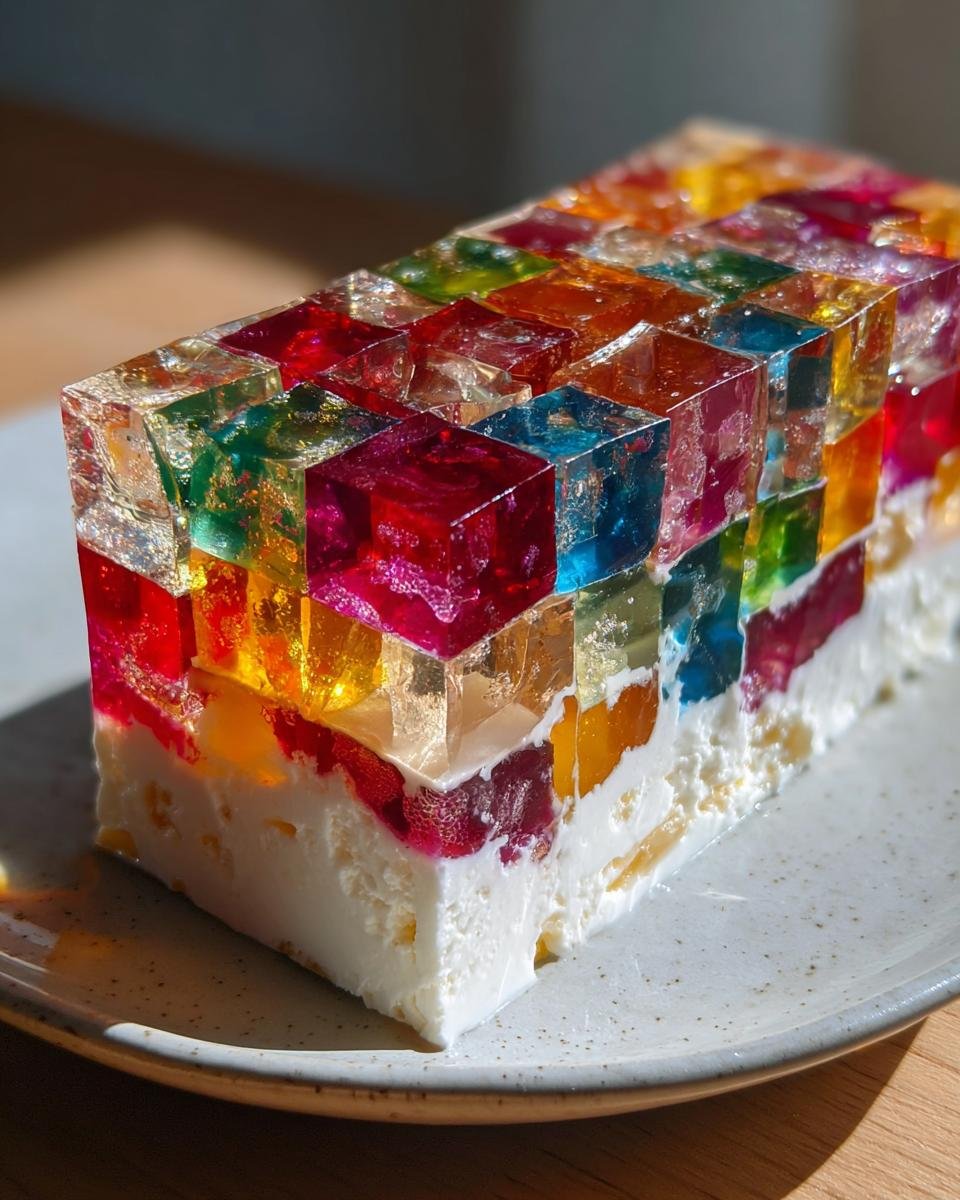
Okay, so picture this: I’m a kid, right? And every single holiday, birthday, or even just a random Tuesday that felt special, out came this dessert. It was like edible stained glass! Bright, wobbly squares suspended in this cloud-like, creamy base. My grandma called it “Broken Glass Cake,” which always sounded a little dramatic, but boy, was it magical. It was my first introduction to making something truly *show-stopping* in the kitchen, even though it was deceptively simple. This is *the* recipe, the one I pull out when I want to instantly transport people back to happy memories or just make them go “Wow!” It’s my go-to **Mosaic Gelatin with Cream Cheese**, and trust me, it’s a total crowd-pleaser.
There’s just something so joyful about those vibrant blocks of color peeking through the creamy white layer. It looks complicated, but it’s really just a bit of planning and some patient chilling. The combination of the jiggly, fruity gelatin and the smooth, rich cream cheese layer is seriously addictive. Every single time I make this Mosaic Gelatin with Cream Cheese, someone asks for the recipe. It’s a classic for a reason, and I can’t wait to share all my little tips and tricks with you!

Why You’ll Love This Mosaic Gelatin with Cream Cheese
Okay, so why is *this* Mosaic Gelatin with Cream Cheese my absolute favorite? Let me tell you!
- It’s **so darn pretty!** Those bright, jewel-toned colors just pop and make everyone smile the minute you bring it out.
- The texture is **dreamy**. You get the fun wobble of the gelatin cubes mixed with the smooth, rich, creamy layer. It’s seriously addictive!
- It’s **easier than it looks**. Seriously! Most of the “work” is just waiting for things to chill. Anyone can make this!
- It’s **perfect for parties**. Birthdays, holidays, potlucks… it fits in everywhere and always gets devoured.
It’s basically happiness on a plate, and that’s why this Mosaic Gelatin with Cream Cheese is a keeper!
Gather Your Ingredients for Mosaic Gelatin
Alright, before we get started on this colorful adventure, let’s make sure you have everything you need lined up. You’ll want:
- 4 packages (3 ounces each) flavored gelatin – Pick your favorite bright colors! I usually go for red, green, blue, and yellow or orange.
- 4 cups boiling water, divided – We need this to dissolve the flavored gelatins.
- 4 cups cold water, divided – To mix with the boiling water for the flavored gelatins.
- 1 package (8 ounces) cream cheese, softened – Make sure it’s nice and soft so it blends smoothly!
- 1 can (14 ounces) sweetened condensed milk – This is where the creamy sweetness comes from.
- 1 envelope unflavored gelatin – This is the magic binder for our creamy layer.
- ½ cup cold water – To bloom the unflavored gelatin.
See? Nothing too fancy! Just simple things that come together for something spectacular.
Step-by-Step Guide to Making Mosaic Gelatin with Cream Cheese
Okay, let’s get down to the fun part – putting this colorful masterpiece together! Don’t be intimidated by the steps; it’s really just a matter of waiting for things to set. Think of it as building with yummy, wobbly blocks!
Preparing the Flavored Gelatin Cubes
First up, we need to get those gorgeous colored squares ready. Grab your flavored gelatin packets! For each packet, you’re going to dissolve it completely in 1 cup of boiling water. Stir it really well until you don’t see any little granules left. Then, stir in 1 cup of cold water. This gives us the right consistency for cutting later.
Pour each color into its own shallow dish. I like using square or rectangular baking dishes because it makes cutting into cubes super easy. Pop these dishes into the fridge. They need to get good and firm, which usually takes at least 3 hours, but honestly, I often just do this the night before so they’re perfectly set. You want them firm enough that you can slice right through them cleanly.
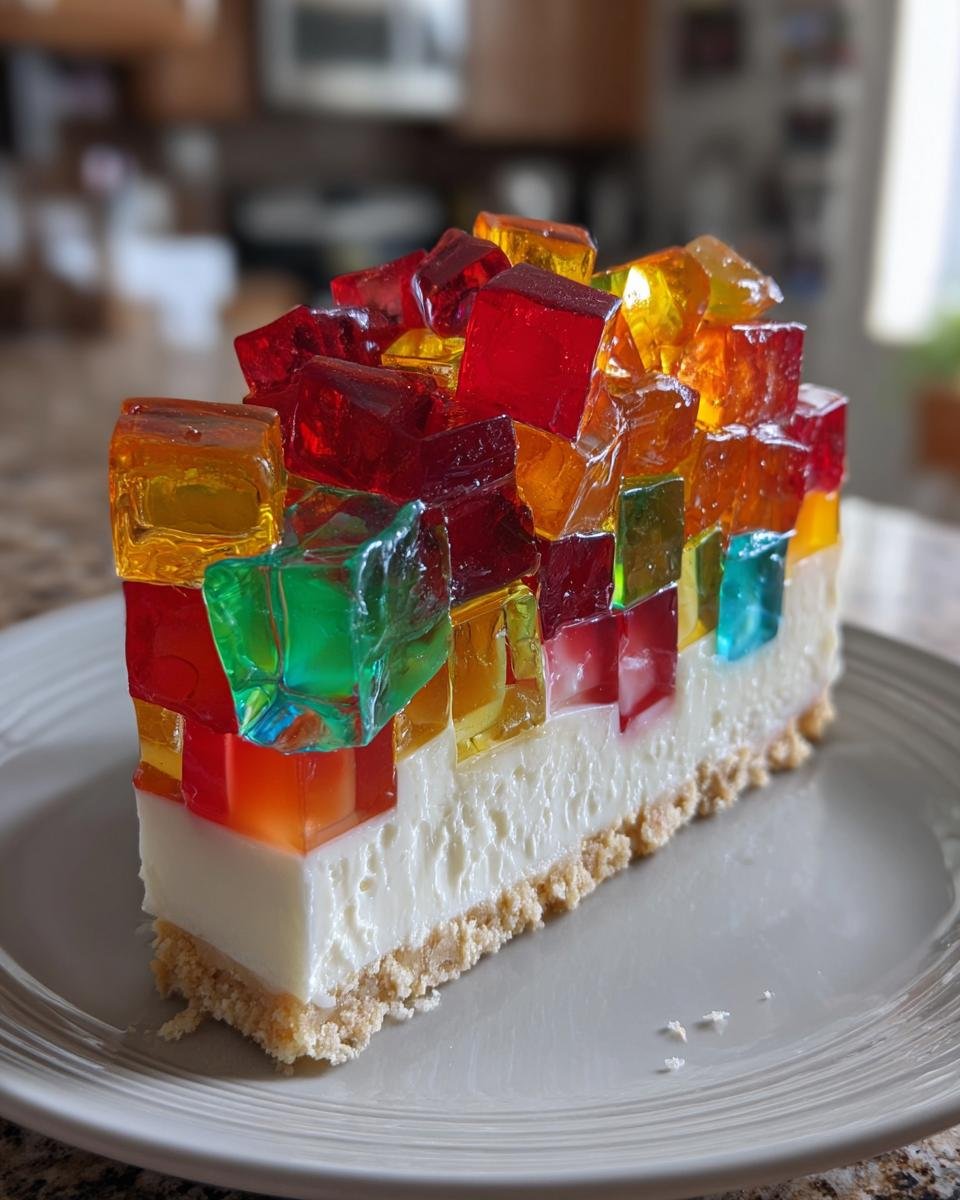
Once they’re firm, it’s cube time! Take a knife and cut the gelatin in the dish into about ½-inch squares. Don’t stress about them being perfect; the charm is in the colorful mix! Gently lift these little cubes out and put them all together in a big bowl. Try not to handle them too much so they keep their shape. Look at all that color! Isn’t it pretty?
Creating the Creamy Mosaic Gelatin with Cream Cheese Layer
Now for the dreamy, creamy part! Make sure your cream cheese is nice and soft. You can leave it out on the counter for a bit, or if you’re in a hurry (like I often am!), you can gently soften it in the microwave for a few seconds – careful not to melt it though! Beat the softened cream cheese in a large bowl until it’s super smooth and there are no lumps.
Next, we need to prep the unflavored gelatin. Sprinkle that envelope of unflavored gelatin over ½ cup of cold water in a small saucepan. Let it sit there for about 5 minutes – this is called “blooming” and it helps it dissolve properly. Then, put the saucepan over low heat and stir it constantly. You just want to warm it up enough for the gelatin to completely dissolve. Don’t let it boil! You’ll see it go from grainy to clear and liquidy.
Now, slowly, slowly whisk that warm, dissolved gelatin mixture into your smooth cream cheese. Whisk it in gradually, making sure it’s well combined. This step is important for getting a smooth, consistent creamy layer. Once that’s all mixed in, grab your can of sweetened condensed milk and gradually whisk that in too until everything is perfectly smooth and creamy. Taste it – it’s so good already!
Assembling and Chilling Your Mosaic Gelatin with Cream Cheese
Alright, time to bring it all together! Take that big bowl of colorful gelatin cubes you made earlier. Gently, oh so gently, fold the cubes into your creamy cream cheese mixture. You want to distribute the colors evenly without breaking up the cubes too much. I use a rubber spatula for this and just scoop and fold until the colors are spread throughout the white. It looks like a party in the bowl!
Now, pour that beautiful mixture into your final dish. A 9×13 inch baking dish works great, or you can use a fancy mold if you like! Smooth the top gently if needed. Pop the whole thing back into the refrigerator.
This is the hardest part: waiting! The Mosaic Gelatin with Cream Cheese needs to chill until it’s completely firm. This usually takes at least 4 hours, but again, overnight is even better to be safe. You’ll know it’s ready when the whole dessert is set and doesn’t jiggle when you gently shake the dish. Once it’s firm, you can cut it into squares right in the dish or, if you used a mold, get ready for the big reveal!
Tips for Perfect Mosaic Gelatin with Cream Cheese
Okay, so you’ve got the basic steps down, but here are a few little tricks I’ve picked up over the years to make your Mosaic Gelatin with Cream Cheese absolutely perfect every single time. These are the things that take it from good to “OMG, you HAVE to give me this recipe!”
- Grease those dishes! A quick spray of non-stick cooking spray or a light wipe with a paper towel and a tiny bit of oil in the dishes you set the colored gelatin in makes cutting and getting the cubes out SO much easier. Seriously, trust me on this one!
- Dissolve that gelatin completely. Whether it’s the flavored stuff or the unflavored for the creamy layer, make sure those little granules are totally gone. If they’re not, you can end up with weird little chewy bits in your dessert, and nobody wants that!
- Chill, baby, chill! Don’t rush the chilling times. Letting the colored gelatin set up properly is key for clean cubes, and letting the final Mosaic Gelatin with Cream Cheese chill fully ensures it holds its shape when you cut it. Patience is your friend here!
Follow these simple tips, and you’re well on your way to a show-stopping dessert!
Variations for Your Mosaic Gelatin
One of the things I love about this Mosaic Gelatin is how easy it is to play around with! Want to change things up? Go for it!
- Change the colors! This is the most obvious one, right? Use red and green for Christmas, pastels for Easter, or your favorite team’s colors for a game day treat. The possibilities are endless!
- Add some fruit! You can gently fold in some well-drained canned fruit, like mandarin oranges or pineapple tidbits, along with the gelatin cubes. Just make sure it’s canned fruit, as fresh pineapple, kiwi, and some others contain enzymes that will prevent the gelatin from setting!
- Try different molds! While a baking dish is easy, you can pour the mixture into a Bundt pan or individual ramekins for a different look. Just make sure to grease them well!
- Swap the creamy layer base. While cream cheese is my absolute favorite for this Mosaic Gelatin, you could experiment with using just sweetened condensed milk and dissolved unflavored gelatin for a slightly less rich, but still creamy, version.
Have fun making this Mosaic Gelatin your own!
Serving and Storing Mosaic Gelatin with Cream Cheese
Once your beautiful Mosaic Gelatin with Cream Cheese is perfectly chilled and firm, it’s ready to be the star of the show! If you used a baking dish, just slice it into squares right in the dish, or you can carefully lift the whole thing out onto a cutting board (if you greased it well!) and cut it there. If you used a mold, you’ll carefully unmold it onto a serving plate. It looks so impressive!
Leftovers? (If there even are any!) Just cover the dish tightly with plastic wrap or pop individual pieces into an airtight container. Keep it stored in the refrigerator. This Mosaic Gelatin with Cream Cheese will stay good for 3-4 days, though the gelatin cubes might start to soften a tiny bit over time. No need to reheat this one – it’s best served cold and wobbly!
Common Questions About Mosaic Gelatin
I get asked a few questions pretty often about making this Mosaic Gelatin with Cream Cheese, so I figured I’d answer them right here for you!
Q: Can I use sugar-free gelatin? Absolutely! If you’re looking to cut down on sugar, sugar-free flavored gelatin works just fine for the colored cubes. Just follow the package directions for setting it up.
Q: My creamy layer isn’t smooth. What went wrong? This usually happens if your cream cheese wasn’t soft enough or if the unflavored gelatin wasn’t completely dissolved. Make sure that cream cheese is *really* softened, and give that unflavored gelatin mixture a good stir over low heat until it’s totally clear before adding it to the cream cheese.
Q: How do I get the Mosaic Gelatin out of a mold? This can be a little tricky! First, make sure you greased the mold really well. Then, dip the bottom of the mold carefully into warm (not hot!) water for just a few seconds to loosen it. Place your serving plate upside down on top of the mold, and then quickly flip them both over. Give it a gentle shake, and it should plop out! If it doesn’t, try dipping it in the warm water for just another second or two.
Q: Can I make this ahead of time? Yes, please do! This Mosaic Gelatin with Cream Cheese is actually perfect for making a day or even two ahead of time. It gives all the flavors a chance to meld and ensures it’s completely set before serving.
Estimated Nutritional Information
Okay, so while we’re focused on the deliciousness, sometimes it’s good to have an idea of what’s in a serving. Based on the ingredients in this Mosaic Gelatin with Cream Cheese recipe, here’s a rough estimate per serving:
- Calories: Around 350
- Fat: About 15g
- Protein: Roughly 5g
- Carbohydrates: Approximately 50g
Just remember, these are estimates and can vary depending on the exact brands and ingredients you use. Enjoy your treat!
Print
Amazing 4-Flavor Mosaic Gelatin With Cream Cheese
- Total Time: 7 hours 35 minutes
- Yield: 12 servings 1x
- Diet: Vegetarian
Description
A colorful and festive gelatin dessert with a creamy cheese layer.
Ingredients
- 4 packages (3 ounces each) flavored gelatin (various colors)
- 4 cups boiling water, divided
- 4 cups cold water, divided
- 1 package (8 ounces) cream cheese, softened
- 1 can (14 ounces) sweetened condensed milk
- 1 envelope unflavored gelatin
- ½ cup cold water
Instructions
- Prepare each package of flavored gelatin separately according to package directions using 1 cup boiling water and 1 cup cold water. Pour each color into a separate shallow dish. Refrigerate until firm, at least 3 hours or overnight.
- Cut the firm gelatin into ½-inch cubes. Gently combine the cubes in a large bowl.
- In a large bowl, beat the softened cream cheese until smooth.
- In a small saucepan, sprinkle the unflavored gelatin over ½ cup cold water. Let stand for 5 minutes to soften. Heat over low heat, stirring constantly, until the gelatin is completely dissolved. Do not boil.
- Gradually whisk the dissolved gelatin mixture into the softened cream cheese until well combined.
- Gradually whisk in the sweetened condensed milk until smooth.
- Gently fold the gelatin cubes into the cream cheese mixture.
- Pour the mixture into a 9×13 inch baking dish or a large mold.
- Refrigerate until firm, at least 4 hours or overnight.
- Cut into squares or unmold to serve.
Notes
- For easier cutting, lightly grease the dishes before pouring the gelatin.
- Use different color combinations for various holidays or occasions.
- Prep Time: 30 minutes
- Cook Time: 5 minutes
- Category: Dessert
- Method: No Bake
- Cuisine: American
Nutrition
- Serving Size: 1 serving
- Calories: 350
- Sugar: 50g
- Sodium: 120mg
- Fat: 15g
- Saturated Fat: 9g
- Unsaturated Fat: 3g
- Trans Fat: 0g
- Carbohydrates: 50g
- Fiber: 0g
- Protein: 5g
- Cholesterol: 40mg
Keywords: gelatin, dessert, cream cheese, colorful, mosaic