
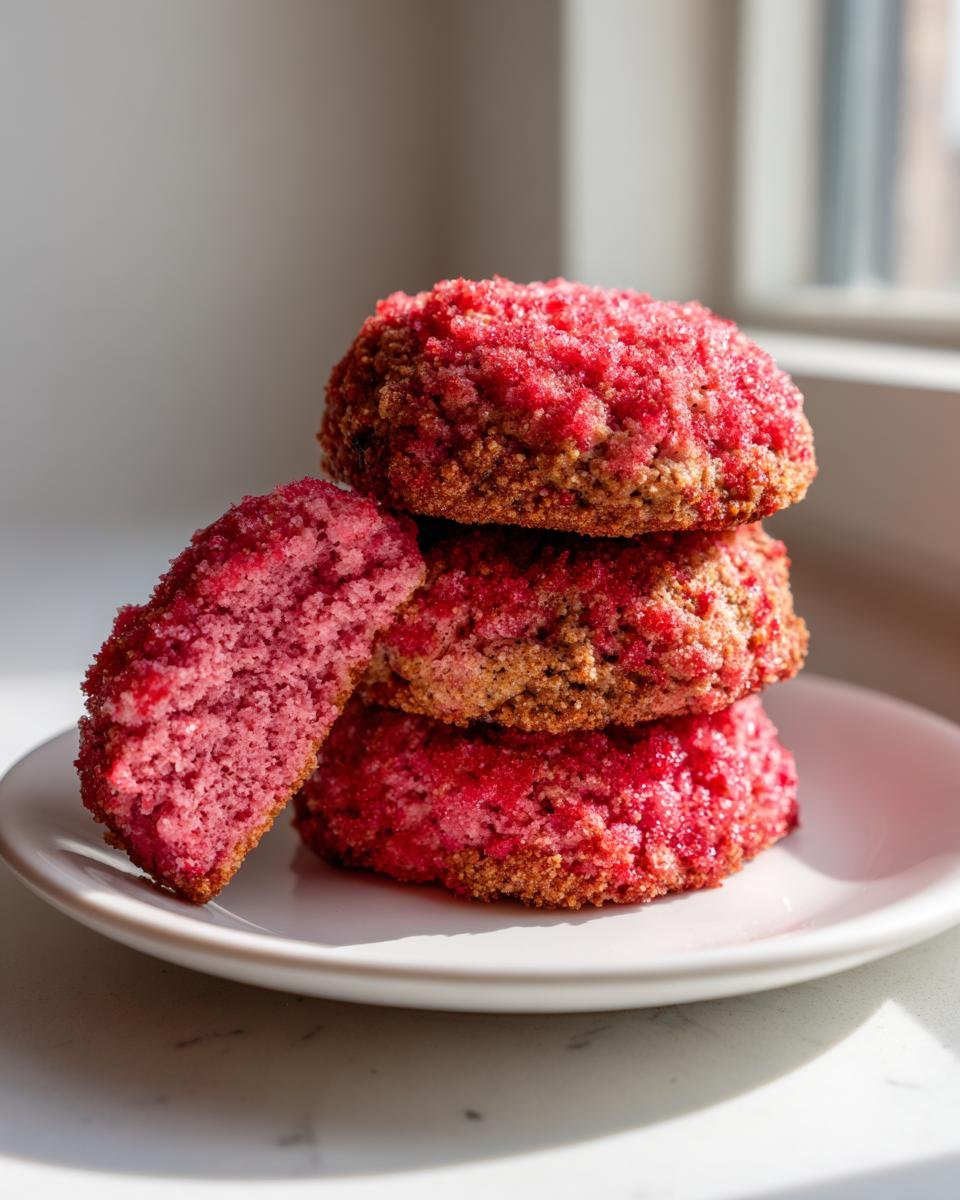
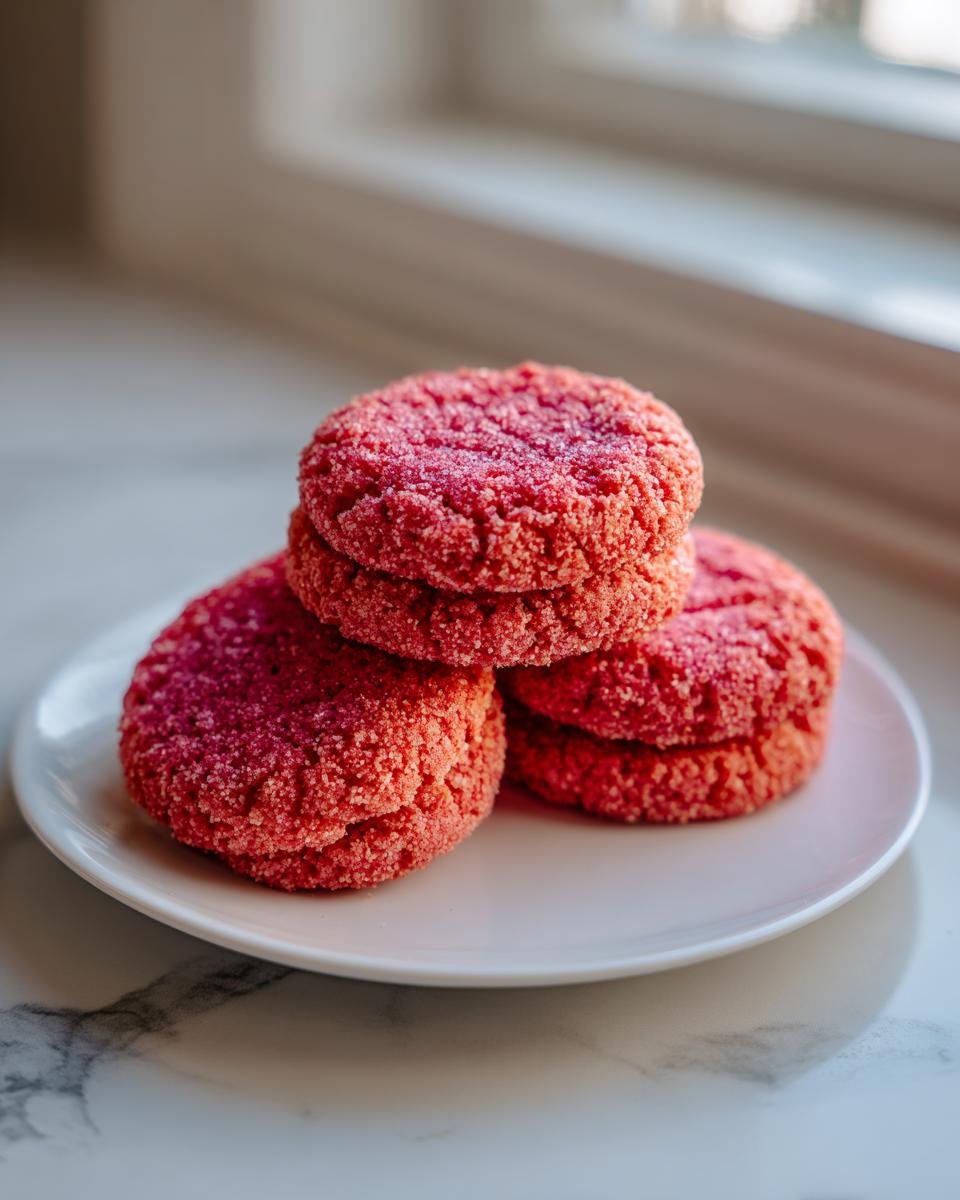
Oh my goodness, are you ready for the cookie of the summer? Forget those sad, crumbly shortbreads or flat, boring sugar discs. I’ve cracked the code on a cookie that tastes like sunshine, nostalgia, and pure joy all rolled into one perfect bite. It took me three tries to get the crunch coating just right—the first batch’s powder was too fine, and it just melted away! But now? Wow. We are talking about a miraculously soft and chewy center exploding with real strawberry flavor thanks to that incredible, unique topping.

This recipe for Strawberry Crunch Cookies is my new ultimate go-to, especially when I need something vibrant and delicious fast. The secret weapon is using freeze-dried strawberries both inside the dough and outside for the crunch. Trust me, once you nail that perfect textural contrast, you’ll never go back to plain cookies again!
Why You Will Love These Strawberry Crunch Cookies
Seriously, these cookies hit every single happy spot in my baking heart. They’re just so satisfying!
- The texture is absolutely phenomenal: a perfectly soft, chewy interior meets that amazing shattering crunch on the outside.
- The flavor isn’t artificial; the use of freeze-dried strawberries means you get a punch of real, vibrant strawberry taste in every bite.
- They come together surprisingly quickly—you can be eating fresh ones in under an hour! And they make about two dozen dreams, which is great for sharing (or hiding some for yourself).
- You can find the ultimate guide for huge batches perfect for events like bake sales right over here: bake sale cookies. If you prefer a different classic flavor, check out how I make my chocolate chip cookies!
What’s not to love, really? They bake up beautifully every time.
Essential Ingredients for Perfect Strawberry Crunch Cookies
Okay, listen up! The ingredients list looks simple, but they are all crucial, especially how we treat those magical freeze-dried strawberries. Getting the butter temperature right and crushing those berries exactly the way I describe below is what separates an okay cookie from the best cookie you’ve ever had. If you love bright berry flavors, you’ll want to check out my blueberry cookie recipe too!
For the Soft Cookie Dough
These are the components that make up the gorgeous, light pink base. Remember, that color comes entirely from the fruit!
- 1 cup (2 sticks) unsalted butter, softened—and I mean *softened*, almost buttery sludge, not just barely room temp.
- 1 cup granulated sugar
- 1 large egg
- 1 teaspoon vanilla extract
- 2 1/2 cups all-purpose flour
- 1 teaspoon baking soda
- 1/2 teaspoon salt
- 1/2 cup freeze-dried strawberries, crushed to a powder—this needs to be fine, like flour, so it integrates completely.
For the Strawberry Crunch Topping
This is where the texture magic happens! You need two different textures of strawberry here, so don’t just throw them all in the same bowl!
- 1/2 cup granulated sugar (just plain white sugar for this coating mix)
- 1/4 cup all-purpose flour
- 1/4 cup freeze-dried strawberries, crushed coarsely—I mean chunky bits here! You want some definite crunch when you bite down.
Once you have these treasures laid out, you’re halfway to tasting summer heaven!
Step-by-Step Instructions for Making Strawberry Crunch Cookies
It’s time to get your hands dirty! This process is so rewarding, and the payoff is huge. Make sure your oven is ready to go first, because once that dough is mixed, we want to get these babies baking right away. If you’re looking for a fun, no-bake alternative after this baking adventure, you have to try my cookie dough dip!
Preparing the Dough and Crunch Coating
First things first: Preheat your oven to 350°F (175°C). Line two baking sheets with parchment paper—this is non-negotiable for easy clean-up and perfect bottoms!
Grab your stand mixer (or a sturdy hand mixer) and start with that softened butter and the full cup of granulated sugar. You need to cream these together until they look pale and fluffy, almost cloud-like. That’s the key to a chewy cookie, so don’t rush this part!
Next, beat in the egg and the vanilla extract until it all looks smooth again. Now, for the dry stuff: whisk your flour, baking soda, and salt separately. Add those dry ingredients slowly to the wet mixture, mixing on low speed until they are *just* combined. Seriously, stop mixing once the flour streaks disappear. Overmixing develops gluten, and we want soft, not tough!
Finally, stir in that fine strawberry powder until the entire dough has turned a lovely uniform pink. While that’s happening, set up your coating station! In a separate shallow dish, whisk together the coating sugar, the additional coating flour, and those coarsely crushed freeze-dried strawberries.
Assembling and Baking Your Strawberry Crunch Cookies
Now for the fun part—the crunch! Scoop your pink dough into nice, even 1-inch balls. Don’t flatten them beforehand.
Take each little ball and roll it immediately and thoroughly in that strawberry crunch mixture. You want that topping to adhere everywhere—really pack it on! The coarse bits are what make this shine. Once coated, place them onto your prepared sheets about 2 inches apart because they will spread a tiny bit.
Pop them into the preheated oven for 10 to 12 minutes. I always err on the side of caution—the edges should look set, but the center must still look a tiny bit soft and underdone. They will continue baking on the hot pan once you pull them out.
Let them sit right on that baking sheet for a full five minutes before you even *think* about moving them. This lets them firm up just enough. Then, gently move them to a wire rack to cool completely. Enjoy the sweet smell!
Expert Tips for the Best Strawberry Crunch Cookies
Even with a great recipe, sometimes you need that little something extra to take a cookie over the top, right? I’ve learned a few tricks over my many, many batches of these cookies that just ensure perfect results every time. These tips are my little secrets to maintaining that amazing texture we worked so hard to create!
Speaking of quick, perfect cookies, if you ever only have a few minutes on your hands, you’ve got to see how I make three-ingredient butter cookies—they are completely different but just as addictive!
Getting the Freeze-Dried Strawberries Just Right
This is the most important part of the whole operation. When it says crush coarsely for the topping, I mean it! I don’t use a blender for the coating because it just turns it into dust, and we lose that beautiful crunch. I put the coarse bits into a heavy zip-top bag and hit them gently, repeatedly, with the bottom of a rolling pin or even a clean meat tenderizer. You want chunks ranging from pea-sized down to large grains.
For the dough part, though, you need that powder so it dissolves and colors the dough nicely. For the powder, a spice grinder or a short pulse in a food processor works wonderfully. These berries are potent, so make sure you store *any* leftovers in a truly airtight container in a cool, dark spot. Humidity is the enemy of freeze-dried fruit!
Controlling Spread and Thickness
If you find your cookies spreading out too thin and losing that nice dome shape, it always comes down to butter temperature or dough temperature. If your kitchen is really hot, pop the dough balls into the fridge for about 15 minutes right before you roll them in the crunch topping. Chilled dough spreads less!
Conversely, if for some reason you want a flatter, chewier cookie (maybe you like that edge to be a little crispier?), leave the dough balls out on the counter for 10 minutes before dipping and baking. But generally, for the soft center we aim for, keeping the dough cool is the best bet!
Knowing When They Are Truly Done
The 10-to-12-minute window is a guide, but your specific oven might run hotter or cooler. You’ll need to watch the edges! When you see those edges start to firm up and just barely turn golden, that’s your cue. If you wait until the center looks fully baked, I guarantee you, they will be hard hockey pucks fifteen minutes later!
Pull them out when the very center still looks pale and slightly underdone. They will look a little greasy too, but don’t panic! Sitting them on that hot baking sheet for those critical five minutes allows them to set up perfectly without overbaking. That’s the hidden science behind a truly soft cookie!
Variations on Classic Strawberry Crunch Cookies
Part of the fun of having a favorite recipe, even one as perfect as these Strawberry Crunch Cookies, is playing around with it! Nothing makes me happier than hearing how you tweaked things based on what you had in the pantry or what flavor mood you were in. It’s your kitchen, so feel free to experiment!
I’ve got a few favorite swaps that I think you’ll absolutely adore. If you’re looking for other fun cookie adventures after this one, you might enjoy looking at my homemade butter cookies—they are so versatile!
Boosting the Cookie Dough Flavor
The base cookie dough is already wonderfully pink and subtly fruity, but we can certainly punch it up a bit! This is where I start when I want to make a batch feel extra decadent.
- White Chocolate Dream: This is my top suggestion. Fold in about 1 cup of good quality white chocolate chips along with the crushed freeze-dried strawberries. The creamy sweetness of the white chocolate melts just perfectly alongside that tart strawberry note. It’s divine!
- Almond Extract Swap: While the recipe calls for vanilla, try swapping half of the vanilla extract for almond extract. Almond and strawberry are best friends, and that little floral note really enhances the berry flavor profile. Just use 1/2 teaspoon vanilla and 1/2 teaspoon almond.
- A Dash of Zest: If you happen to have a fresh lemon or orange lying around, zest about half of it directly into the dough when you add the vanilla. The citrus brightens everything up beautifully without making the cookie taste like a citrus cookie. It just reads as *fresher* strawberry!
Fun Twists on the Crunch Coating
The crunch topping is where you can really change the whole visual and textural experience. You can keep the strawberry flavor dominant but change the supporting cast!
- Lemon Zest Infusion: This pairs perfectly with the zest idea above! Mix in about 1 teaspoon of finely grated lemon zest directly into your crunch topping mixture (the sugar, flour, and coarse berries). The lemon crystals in the topping just glisten, and the flavor explosion when you bite into it is just fantastic.
- Crumb Topping Remix: Want less berry and more textural contrast? Try replacing half of the coating’s sugar with finely crushed vanilla wafers or graham crackers. It gives the coating a slightly sandier, less aggressively sweet finish, letting that strawberry flavor really shine through the base cookie.
- Mocha Crunch (Warning: Not Strawberry!): Okay, this completely changes the flavor, but hear me out! If you use a basic vanilla sugar cookie dough instead of the pink strawberry dough, you can replace all the strawberry powder in the coating with instant coffee powder for a stunning chocolate-cookie-and-fudge lookalike! It’s a great holiday variation!
Honestly, once you see how easy it is to mix and roll, you’ll probably end up making three small batches testing out different things. That’s what I always do!

Storing Your Delicious Strawberry Crunch Cookies
This is often where people go wrong, and honestly, I don’t blame them—who can wait long enough to store these cookies anyway?
The good news is that these Strawberry Crunch Cookies are pretty resilient, but we have one main enemy to worry about: humidity trying to sneak in and ruin that glorious crunch topping. Humidity is the arch-nemesis of crispy texture, plain and simple!
Keeping Them Fresh
The recipe notes are spot on here: you want to keep your cooled cookies in an airtight container at room temperature. Do not try to refrigerate them unless you absolutely have to! Cold air tends to dry out baked goods and can actually make that lovely, soft cookie center get stiff faster.
If you layer them in your container, put a piece of parchment or wax paper between the layers. This keeps them from sticking together, especially if you got a little heavy-handed with that sugary coating mix, which I always do!
Maintaining That All-Important Crunch Factor
For short-term storage—say, the next three or four days—you shouldn’t notice a huge difference in the topping. They stay wonderfully fresh because of the low moisture in the freeze-dried strawberries we used.
However, if you are planning to keep them for a full week, here’s my little trick. If you start noticing the crunch smoothing out a bit after day five, you can give them a quick refresh. Just set your toaster oven (or regular oven on a very low setting, like 200°F) to warm up.
Lay the cookies out on a dry baking sheet for just about three minutes total. You aren’t trying to cook them; you are just trying to gently warm and dry out any absorbed moisture from the air. Let them cool completely again outside the container before you seal them back up. It’s like waking up that crunch all over again!
If you follow those simple airtight rules, you should have fantastic, chewy, crunchy cookies waiting for you for almost a week straight. Though, speaking from experience, they rarely last that long!
Frequently Asked Questions About Strawberry Crunch Cookies
Can I use fresh strawberries instead of freeze-dried for the crunch topping?
Oh, I really wouldn’t advise it for this specific recipe, especially for the crunch topping! Fresh strawberries have way too much water content. If you tried to put fresh strawberries into the coating mixture, you’d end up with mushy patches that steam while baking instead of crisping up.
The magic of the crunch relies entirely on the freeze-dried fruit because it’s shelf-stable and intensely flavored but dry. If you really can’t source freeze-dried berries, you could try making a very thick strawberry jam, baking it until it’s almost completely dry and caramelized—but that’s a whole other project! For these Strawberry Crunch Cookies, stick to the freeze-dried ones for that signature texture.
Why are my Strawberry Crunch Cookies coming out flat instead of domed?
This usually happens for one of two reasons, both related to temperature and structure! The number one culprit is using butter that was too warm or even slightly melted when you creamed it with the sugar. If the butter is greasy, it can’t hold enough air during the creaming step, and the whole cookie structure collapses in the oven.
The second reason could be overmixing after the flour goes in. We talked about that—mixing too much develops gluten, which makes the cookie spread out thinly instead of puffing up nicely. Remember, soft dough balls that are chilled briefly before coating usually yield the best dome!
How do I stop the pink color from fading too much during baking?
That beautiful pink hue comes from the finely crushed freeze-dried strawberries inside the dough, right? While it will always lighten up slightly—that’s just baking science—you can minimize the fading by ensuring your sugar-to-butter creaming is perfect. When you’ve incorporated enough air, the butter mixture is lighter and acts as a better buffer.
Also, don’t overbake! If you pull them out as soon as the edges are set, as I recommend, you preserve more of that vibrant color in the soft center. Seriously, that 10-to-12-minute sweet spot is crucial for keeping the color vibrant.
Can I make the dough ahead of time and chill it?
Yes, you absolutely can, and I sometimes do this when I’m planning ahead!
You can prepare the dough completely, including mixing in the strawberry powder, wrap it tightly in plastic wrap, and store it in the fridge for up to three days. When you are ready to bake, let the dough warm up on the counter for maybe 15 to 20 minutes—it needs to be soft enough to scoop easily.
Once scooped, you have to roll those slightly warmed balls in the crunch coating while the dough is still fairly cool. If the dough gets too warm before coating, the topping might slide off during baking. This refrigeration trick also tends to give the cookies an even chewier texture, so it’s a win-win!
Estimated Nutritional Profile for Strawberry Crunch Cookies
Now, I know a lot of us bakers try not to look too closely at the numbers because a cookie is a cookie, right? But just to give you a general idea of what you’re dealing with when you make a batch of these lovely strawberry cookies, here’s the estimated breakdown per cookie.
- Serving Size: 1 cookie
- Calories: 180
- Sugar: 15g
- Fat: 9g (5g Saturated)
- Carbohydrates: 24g
Please remember these are just estimates! Your exact measurements, the size of your egg, or even the brand of butter you use can change these numbers a bit. Enjoy them guilt-free!
Share Your Perfect Strawberry Crunch Cookies Experience
Okay, look, I’ve shared all my secrets—all my trials, errors, and triumphs—to make sure you get the absolute best Strawberry Crunch Cookies possible on your first try!
But now I need to hear from you! Baking is a community effort, and nothing makes me happier than knowing this recipe has made someone’s day a little bit sweeter.
Rate Your Crunch Level
Did they turn out perfectly chewy? Did that topping give you the satisfying *crack* you were hoping for? I’d love it if you’d take a moment to rate the recipe! Just drop those stars down below. A 5-star rating always lets me know I should keep sharing my grandma’s (and my own!) crazy kitchen hacks.
Tell Me About Your Batch!
Did you try the almond extract swap? Did you go completely wild with the lemon zest in the topping? Tell me about your successes or any little bumps you hit along the way in the comments section!
- What did you serve them with? (I highly recommend a tall glass of cold milk!)
- How long did they actually last in your house? (Be honest!)
- Do you prefer chilling the dough or baking straight away?
I read every single comment, and your feedback helps me make this recipe even better for the next person who stumbles upon it looking for the perfect cookie!
Snap a Photo and Tag Me
Honestly, if you don’t post a picture, did you even bake those stunning pink cookies?!
When you pull those beautiful, crunchy, pink-dusted cookies out of the oven, do me a huge favor: snap a picture! Share it on your favorite social media platform and tag me. I absolutely love seeing my recipes come to life in your kitchens.
Let’s make the world a crunchier, strawberry-flavored place, one batch at a time!
Print
Strawberry Crunch Cookies
- Total Time: 32 min
- Yield: 24 cookies 1x
- Diet: Vegetarian
Description
A recipe for soft, chewy cookies topped with a sweet, crunchy strawberry coating.
Ingredients
- 1 cup (2 sticks) unsalted butter, softened
- 1 cup granulated sugar
- 1 large egg
- 1 teaspoon vanilla extract
- 2 1/2 cups all-purpose flour
- 1 teaspoon baking soda
- 1/2 teaspoon salt
- 1/2 cup freeze-dried strawberries, crushed to a powder
- 1/2 cup granulated sugar (for coating)
- 1/4 cup all-purpose flour (for coating)
- 1/4 cup freeze-dried strawberries, crushed coarsely (for coating)
Instructions
- Preheat your oven to 350°F (175°C). Line baking sheets with parchment paper.
- In a large bowl, cream together the softened butter and 1 cup of sugar until light and fluffy.
- Beat in the egg and vanilla extract until combined.
- In a separate bowl, whisk together the flour, baking soda, and salt. Gradually add the dry ingredients to the wet ingredients, mixing until just combined.
- Stir in the finely crushed freeze-dried strawberries until the dough is uniformly pink.
- In a shallow dish, mix the 1/2 cup sugar, 1/4 cup flour, and coarsely crushed freeze-dried strawberries for the crunch topping.
- Roll dough into 1-inch balls. Roll each ball in the crunch topping mixture until fully coated.
- Place the coated dough balls onto the prepared baking sheets, about 2 inches apart.
- Bake for 10 to 12 minutes, or until the edges are set but the centers are still soft.
- Let the cookies cool on the baking sheet for 5 minutes before transferring them to a wire rack to cool completely.
Notes
- For the best crunch texture, ensure the freeze-dried strawberries for the coating are crushed into varied sizes.
- Store cooled cookies in an airtight container at room temperature.
- Prep Time: 20 min
- Cook Time: 12 min
- Category: Dessert
- Method: Baking
- Cuisine: American
Nutrition
- Serving Size: 1 cookie
- Calories: 180
- Sugar: 15
- Sodium: 75
- Fat: 9
- Saturated Fat: 5
- Unsaturated Fat: 4
- Trans Fat: 0
- Carbohydrates: 24
- Fiber: 1
- Protein: 2
- Cholesterol: 30
Keywords: strawberry cookies, crunch topping, strawberry dessert, baked goods, sweet treat