
Forget every sad, soggy chicken sandwich you’ve ever eaten. Seriously, toss them out of your memory! We are talking about taking that bright, garlicky punch of Caesar salad and smashing it right onto a deeply satisfying, perfectly golden piece of fried chicken. This is how you elevate your lunch game instantly. Our recipe for the ultimate Crispy Chicken Caesar Sandwich is ridiculously simple, but I learned early on that the crunch comes down to one thing: the breading mix.
I spent way too many weekends trying to get that ideal crust. Too much egg wash, and it gets gummy; too little breadcrumb, and it falls apart. I finally nailed the ratio after a massive kitchen splatter incident one Sunday. Now, I use panko breadcrumbs religiously for a craggy, shatteringly crisp texture that holds up against the sharp Caesar dressing. Trust me when I say, this sandwich is my go-to when I need something fast but fiercely flavorful. If you have a fantastic Caesar dressing already made, you’re halfway there! If not, you might want to check out my go-to recipe for homemade dressing right here; it makes a huge difference!
Why You Will Love This Crispy Chicken Caesar Sandwich
This isn’t just another lunch filler, folks. This is a serious sandwich experience, and here’s why I keep making it:
- It’s blisteringly fast! Total time under 30 minutes, perfect for a weeknight dinner, honestly.
- That Panko crunch is non-negotiable; it stays crisp even with the dressing.
- It captures all the bright, tangy, cheesy flavors of a great Caesar salad.
- You’re using simple ingredients you likely already have on hand.
- The thin cutlets cook quickly, so you aren’t waiting around for lunch!
Essential Ingredients for the Crispy Chicken Caesar Sandwich
Getting the perfect texture and flavor starts right here with our list. I always lay everything out first—it makes the whole breading process so much smoother and way less stressful! We are focusing on coating the chicken properly and then bringing in those classic Caesar notes in the final build.
For the Crispy Chicken Coating
This is where the magic happens for your crunchy exterior! Remember, we want maximum crispiness for this sandwich.
- 2 boneless, skinless chicken breasts, sliced horizontally to give you four nice, thin cutlets.
- 1 cup all-purpose flour.
- 1 teaspoon salt, 1/2 teaspoon black pepper, and 1/2 teaspoon garlic powder—that’s our seasoning base for the flour.
- 1 large egg, whisked up with 1/4 cup milk.
- 1 cup panko breadcrumbs. Seriously, don’t substitute these; panko is king for supreme crunch on this delicious crispy fried chicken.
For the Sandwich Assembly
Now for everything that makes it a Caesar!
- Vegetable oil, enough to cover about an inch in your skillet for frying.
- 4 sandwich buns—whatever kind you love, just be ready to toast them lightly!
- 1 cup of your favorite Caesar dressing. I highly recommend checking out my favorite recipe if you want to make it homemade, it really boosts the flavor of the Crispy Chicken Caesar Sandwich.
- 2 cups romaine lettuce, chopped up nice and fine.
- 1/4 cup grated Parmesan cheese for that salty bite.
Step-by-Step Instructions for the Crispy Chicken Caesar Sandwich
Okay, let’s get cooking! I know frying can seem intimidating, but once you set up your dredging stations, it’s totally relaxing. Think of it like building a crispy wall around that tender chicken breast. We want a sequence that builds flavor and structure fast. Get your oil heating now because timing is everything here!
Preparing and Breading the Chicken for Your Crispy Chicken Caesar Sandwich
First things first, make sure those chicken breasts are sliced thinly—about half an inch thick is perfect. We have three shallow dishes ready to go. Dish one has your seasoned flour, dish two has your egg and milk whisked nicely, and dish three is packed with the panko. You have to work quickly here! Take one cutlet, give it a good shake after the flour bath (we don’t want clumps!), dip it into the egg mixture so it’s wet all over, and then press it firmly into the panko. Really press that panko on there so it sticks tight. That firm press is what guarantees the crunch on your final chicken sandwich.

Frying the Chicken to Golden Perfection
Heat up about an inch of vegetable oil in a heavy-bottomed skillet until it hits a steady 350°F (175°C). Seriously, that temperature is key! If it’s too cool, the chicken gets oily; too hot, and the outside burns before the inside cooks. Gently place your breaded cutlets in—and this is my secret tip—don’t overcrowd the pan! If you squeeze too many in, the oil thermometer drops instantly, and you end up with soggy chicken. Fry these beauties for 4 to 5 minutes on each side until they are gorgeously golden brown. Always use a meat thermometer just to be sure; we need that internal temperature to hit 165°F (74°C). Once they’re done, pull them out and let them rest on a wire rack to drain off all that extra oil. This lets the crust set up perfectly!
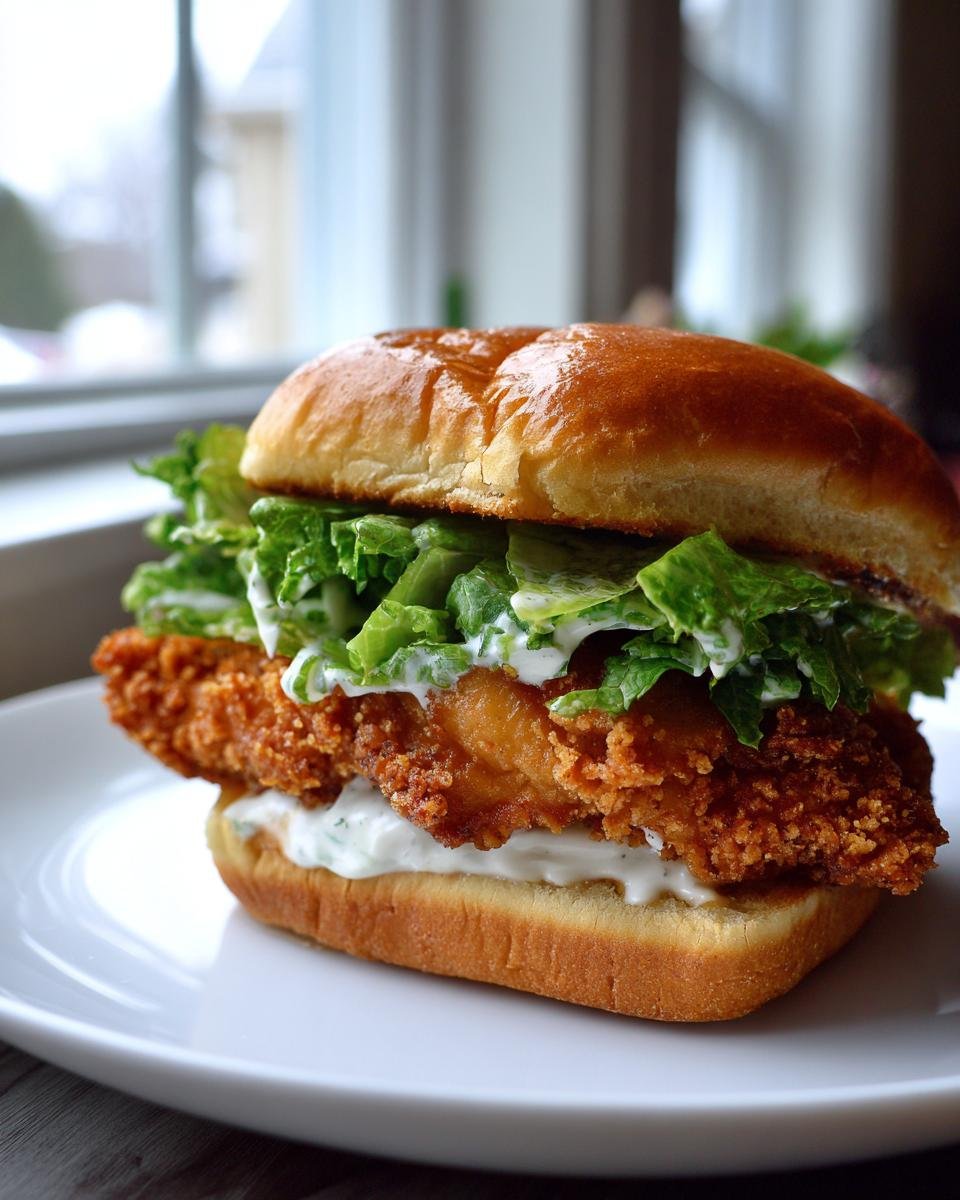
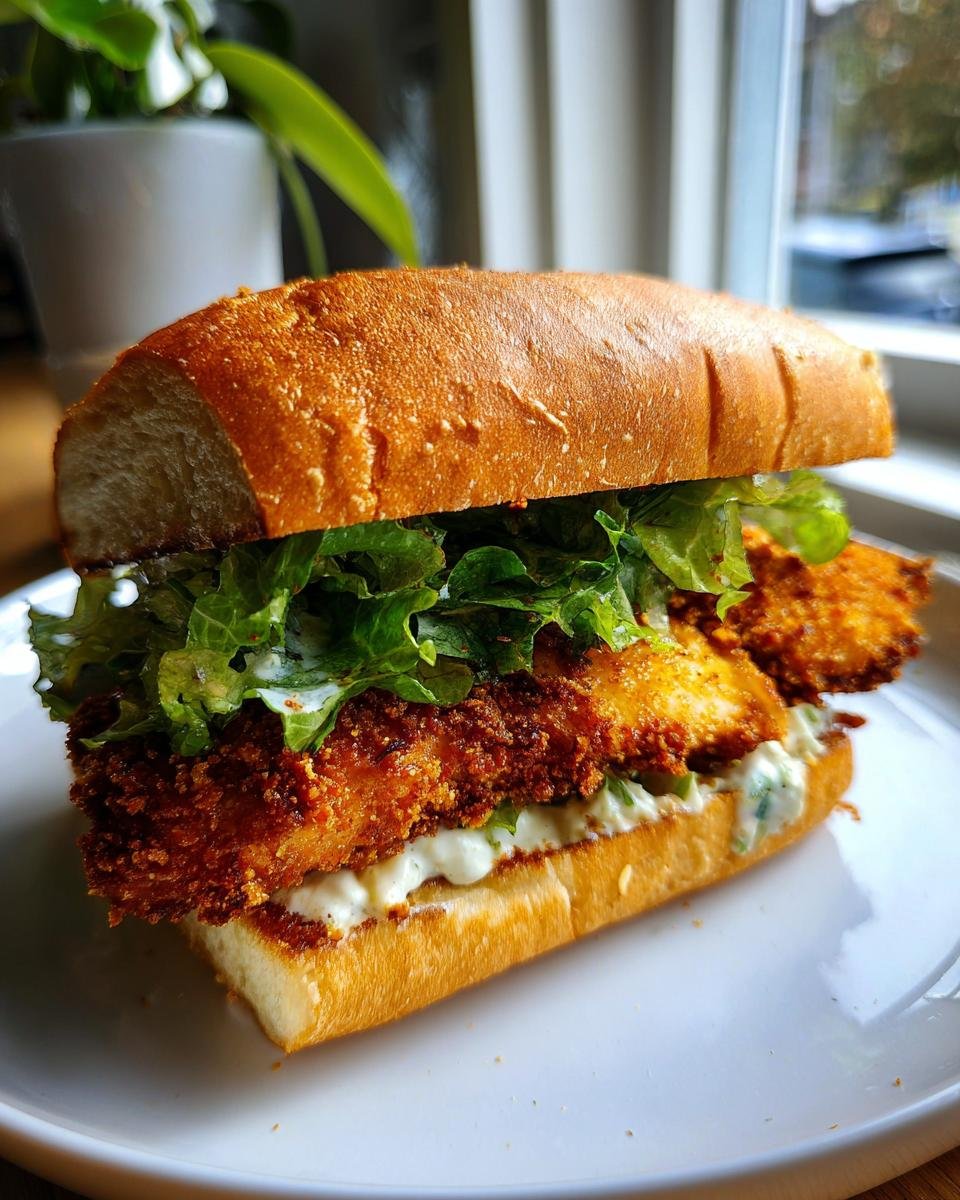
Assembling the Ultimate Crispy Chicken Caesar Sandwich
While the chicken is resting, lightly toast your buns if you like that extra layer of texture. Now, take the dressing—and be generous!—and spread a nice coating on both the top and bottom buns. Place your piping hot, crispy cutlet down first. Pile on your chopped romaine lettuce, sprinkle that salty Parmesan cheese right over the top, and cap it off with the top bun. You have to eat this right away to appreciate the full effect of the Crispy Chicken Caesar Sandwich!
Tips for the Crispiest Chicken Caesar Sandwich Every Time
Listen, achieving maximum crispness is my personal mission every time I make this. Since we are frying, temperature control is your best friend. When you drop those gorgeous, panko-crusted cutlets into the oil, you have to be absolutely sure that oil is reading 350°F (175°C). If you let it dip, even slightly, that beautiful Panko starts soaking up oil instead of crisping up. It’s a bummer, believe me, I’ve been there!
Another non-negotiable tip? Thickness matters! Make sure you’re slicing those chicken breasts horizontally into thin cutlets. Thin pieces cook through much faster, which means the exterior coating doesn’t sit in the hot oil long enough to absorb grease or lose its crunch before the inside hits that safe temperature of 165°F (74°C).
Now, if you’re trying to keep things a little lighter or maybe you just don’t want to deal with frying oil, baking is a solid option, and it still works great for this Crispy Chicken Caesar Sandwich. Trust me, the texture won’t be quite the same shatteringly hard crunch as frying, but it’s really good! Just pop those breaded cutlets onto a wire rack set over a baking sheet—that airflow underneath is crucial—and bake them in a 400°F (200°C) oven for about 20 to 25 minutes. Remember to flip them halfway through so both sides get nice and golden!
Finally, always drain them on a wire rack, not paper towels if you can help it. Paper towels trap steam underneath the chicken, and steam is the enemy of crispiness! A rack lets the air circulate all around the crust as it cools down just a touch before it hits that dressing.
Ingredient Notes and Substitutions for Your Crispy Chicken Caesar Sandwich
Let’s talk about tweaking this recipe because I know not everyone has exactly what they need sitting in their pantry! The heart of this Crispy Chicken Caesar Sandwich is the texture, so we need to be careful with the main players.
If you don’t have whole chicken breasts handy, don’t stress out! You can absolutely swap those out for store-bought chicken tenders or even thin-cut boneless chicken thighs if you prefer a bit more richness. If you choose tenders, just watch your frying time because they are usually smaller and cook faster than custom cutlets. You might only need four minutes a side!
As for the buns, I usually reach for a brioche bun because I like how the slightest sweetness plays against the salty Parmesan and the savory chicken, but honestly, any soft roll will work great. Potato rolls make fantastic sandwiches, too! Just make sure whatever you choose toasts up nicely.
Now, we have to talk about the star flavor: the Caesar dressing. If you are using a store-bought jar, that’s fine; just grab a brand that you really love because it coats everything. But if you’ve got five extra minutes, making your own dressing just blows the jarred stuff out of the water. The fresh lemon juice and anchovy paste really wake everything up! I shared my favorite recipe where you can see every step.
The Panko breadcrumbs are the one thing I never swap out for this recipe. If you use standard fine breadcrumbs, you won’t get that wild, spiky crunch we are aiming for in this masterpiece of a Crispy Chicken Caesar Sandwich. Stick to the Panko for the crunch factor!
Serving Suggestions for Your Crispy Chicken Caesar Sandwich
Once you bite into that perfectly crunchy, tangy sandwich, you’re going to realize it’s a little intense—in the best way possible! Because the flavors are so bold, you don’t need a huge complicated side dish taking up all the attention. We want things that are quick and easy to balance out that rich fried chicken.
For me, if I’m making this for a quick Friday lunch, I usually just grab a bag of crispy kettle chips. The extra sharp crunch of a good potato chip just mirrors what we’re getting from the chicken coating, so it’s a textural win!
However, if you’re serving this as a slightly bigger meal, you need something that cuts through the richness a bit. Sweet potato fries are fantastic here—that little bit of sweetness is a perfect contrast to the savory Parmesan and garlic in the Caesar. If you happen to have some homemade dressing left over from making the sandwich, you could even whip up a quick side of my creamy potato salad instead of fries!
And if you’re trying to keep it even a tiny bit lighter, just chop up some extra romaine, toss it with olive oil, lemon juice, and maybe a little more Parmesan, and serve that right alongside. It keeps the Caesar theme going without adding any extra fried elements. Keep it simple; the sandwich is the star, always!
Storage and Reheating Instructions for Leftover Crispy Chicken Caesar Sandwich Components
Okay, let’s talk leftovers, because if you are lucky enough to have any pieces of that glorious, crispy chicken left over from making your Crispy Chicken Caesar Sandwich, you need to handle them like fine crystal. The number one rule right here: Do not, under any circumstances, assemble the full sandwich and try to store it. That crisp crust doesn’t stand a chance against lettuce moisture and Caesar dressing—it turns into a sad, beige sponge instantly.
If you have extra cooked chicken cutlets, you absolutely must store them separately. Pop them into an airtight container, but here’s the trick: line the bottom of the container with a paper towel first, and stick another paper towel loosely on top before sealing the lid. This traps a bit of any residual moisture from escaping steam, helping that crust stay as firm as possible while waiting in the fridge. It will last about three days this way, maybe four if you’re lucky!
When lunchtime rolls around the next day and you’re ready for your leftover chicken treat, ditch the microwave. I know it’s fast, but microwaving fried things is like signing their death warrant; they turn rubbery and soft. We need to bring that crispness back to life!
Bringing Back That Crunch: Reheating Fried Chicken
My favorite method, hands down, is the oven or a toaster oven. Preheat it to about 375°F (190°C). Place the cold chicken cutlets directly on a metal rack set over a baking sheet—again, airflow is your best friend here. Slide them in for about 8 to 10 minutes. You are just warming them through and trying to wick away any moisture that settled in overnight. They come out piping hot and almost as crispy as they were fresh!
If you have an air fryer, you are golden! Set that baby to 375°F (190°C) and give the chicken 5 to 7 minutes. It blasts the exterior dry beautifully. Remember, these reheating methods are just for the chicken component!
Reassembling for a Second Day Crispy Chicken Caesar Sandwich
Once the chicken is perfectly hot and crisp again, you assemble the sandwich exactly as we did the first time. Toast those buns lightly (this gives the bun structure to fight the dressing!), spread on your Caesar dressing—maybe a little less this time so the bread doesn’t wilt immediately—layer on your hot, crispy chicken, fresh lettuce, and fresh Parmesan. Take the lettuce and cheese out of the fridge while the chicken reheats so they aren’t ice cold going onto the hot chicken. Eating this the next day brings me so much joy, knowing I nailed two meals with one easy frying session!
Frequently Asked Questions About the Crispy Chicken Caesar Sandwich
It’s totally normal to have questions when you’re trying to achieve fast food perfection at home! I get asked about shortcuts or swapping things out all the time. Here are answers to the things you’re probably wondering about when building your absolute best Crispy Chicken Caesar Sandwich.
Can I make this Crispy Chicken Caesar Sandwich ahead of time?
You absolutely can prep bits ahead! Remember, the moment you introduce moisture—like that glorious Caesar dressing—to the crispy coating, it starts to wilt. It’s science, I guess! So, here is what I do: I’ll coat all my chicken cutlets in the flour and panko the night before and keep them in an airtight container in the fridge. Day-of, all you have to do is get your oil hot and do the egg dip and the final fry. That way, you still get that fresh-from-the-fryer crunch as planned!
The only other thing I prep ahead is chopping the romaine. Keep that dry in the container, and you’re golden. Assembly, though? That has to happen right before you eat it. No exceptions if you want that full crisp experience!
What is the best way to ensure the chicken stays crispy?
This is my favorite question! It comes down to two things we talked about, and I want to hammer them home because they are the difference between “great” and “legendary.” First up: Panko breadcrumbs. They are light and jagged and make that craggy crust that sheds water and stays crunchy. Don’t swap them for standard crumbs!
Second: The drain! When you pull those cutlets, put them immediately on a wire rack. If you put hot chicken directly onto a plate lined with paper towels, the steam that rises off the bottom of the chicken has nowhere to go, gets trapped, and guess what? Soggy bottom! A rack lets the air circulate all the way around. And again, never store the assembled sandwich; lettuce and dressing are bad news for the crust overnight.
Can I use chicken tenders instead of breasts for the Crispy Chicken Caesar Sandwich?
Yes, you totally can! Chicken tenders are often already a good, consistent thickness, which is super convenient. Since they are usually smaller and thinner than the even cutlets you get from slicing a breast, you might find they cook even faster. So, if you use tenders, keep a close eye on them! You might only need about three to four minutes per side instead of the full five minutes. Use that meat thermometer, though, just to make sure you hit the safe 165°F (74°C) inside. They’ll still get wonderfully crispy with the same breading.

Estimated Nutritional Information for the Crispy Chicken Caesar Sandwich
I’m so happy you asked about the damage these beautiful sandwiches do to the waistline! They are definitely a treat, not an everyday thing in my house, but totally worth it once in a while. Here is the breakdown based on the ingredients listed—just remember these numbers are estimates. If you use a lighter Caesar and bake instead of fry, you can definitely shave off some of that fat content!
- Serving Size: 1 sandwich
- Calories: 550
- Fat: 28g total (including 5g saturated fat)
- Carbohydrates: 40g
- Protein: 35g
- Sodium: 850mg
This table is just a guide to give you a ballpark idea of what you’re getting with this incredible Crispy Chicken Caesar Sandwich.
Share Your Perfect Crispy Chicken Caesar Sandwich
Well, that’s it! You’ve got the secrets, the steps, and all my personal tips for making the most satisfying, crunchy, cheesy, Caesar-packed sandwich you’ve ever had. I’m so excited just thinking about you all taking a bite of that crispy chicken!
I really, truly want to know what you think! Did the Panko give you the shatteringly crisp texture I promised? Did you use my homemade Caesar dressing suggestion, or did you stick to store-bought? Don’t be shy!
Jump down to the comments section below and let me know how your Crispy Chicken Caesar Sandwich turned out! If you made any fun little tweaks, tell me about those too. And if you snapped a picture of your masterpiece before you devoured it? Tag me on social media! Seeing your kitchen creations always makes my day. Happy cooking, everyone!
Print
Crispy Chicken Caesar Sandwich
- Total Time: 30 min
- Yield: 4 servings 1x
- Diet: Low Fat
Description
A simple recipe for a crispy chicken sandwich featuring Caesar dressing and romaine lettuce.
Ingredients
- 2 boneless, skinless chicken breasts
- 1 cup all-purpose flour
- 1 teaspoon salt
- 1/2 teaspoon black pepper
- 1/2 teaspoon garlic powder
- 1 large egg
- 1/4 cup milk
- 1 cup panko breadcrumbs
- Vegetable oil for frying
- 4 sandwich buns
- 1 cup Caesar dressing
- 2 cups romaine lettuce, chopped
- 1/4 cup grated Parmesan cheese
Instructions
- Slice chicken breasts in half horizontally to create four thin cutlets.
- In a shallow dish, mix flour, salt, pepper, and garlic powder.
- In a second shallow dish, whisk the egg and milk.
- In a third shallow dish, place the panko breadcrumbs.
- Dredge each chicken cutlet first in the flour mixture, shaking off excess.
- Dip the floured cutlet into the egg mixture, letting excess drip off.
- Coat the cutlet thoroughly in the panko breadcrumbs, pressing lightly to adhere.
- Heat about 1 inch of vegetable oil in a large skillet over medium-high heat to 350°F (175°C).
- Carefully place chicken cutlets in the hot oil, frying for 4-5 minutes per side until golden brown and cooked through (internal temperature reaches 165°F or 74°C).
- Remove chicken from oil and place on a wire rack or paper towel-lined plate to drain.
- Lightly toast the sandwich buns, if desired.
- Assemble the sandwiches: spread Caesar dressing on both halves of each bun.
- Place one crispy chicken cutlet on the bottom bun.
- Top the chicken with chopped romaine lettuce and grated Parmesan cheese.
- Place the top bun on the sandwich.
- Serve immediately.
Notes
- You can bake the chicken instead of frying; bake at 400°F (200°C) for 20-25 minutes, flipping halfway.
- Use your favorite store-bought or homemade Caesar dressing.
- Prep Time: 15 min
- Cook Time: 15 min
- Category: Lunch
- Method: Frying
- Cuisine: American
Nutrition
- Serving Size: 1 sandwich
- Calories: 550
- Sugar: 5
- Sodium: 850
- Fat: 28
- Saturated Fat: 5
- Unsaturated Fat: 23
- Trans Fat: 0
- Carbohydrates: 40
- Fiber: 2
- Protein: 35
- Cholesterol: 110
Keywords: crispy chicken, chicken sandwich, Caesar dressing, panko, fried chicken, lunch