
Oh my goodness, there’s just nothing that beats the smell of real, yeast-risen bread baking, is there? It fills the whole house with the best kind of warmth. Sure, you can grab a plastic bag of store-bought breakfast bread, but trust me—it falls apart the second you try to toast it! That’s why I’m so excited to share my secret for making truly classic **English Muffins** right here in your own kitchen.
This recipe is genuinely straightforward; it’s not fussy or complicated like some sourdough bakes. We’re talking about achieving that perfect, fluffy interior studded with tons of nooks and crannies, all achieved on a simple griddle. Once you try these homemade **English Muffins**, you won’t ever go back to the pre-packaged stuff. You deserve that amazing breakfast, and I’m going to show you exactly how to get it!

We’re going to use these perfected rounds in the most amazing breakfast sandwich, too. You absolutely have to check out my favorite way to build it over at ultimate English muffin breakfast sandwich when you’re done baking!
Essential Ingredients for Perfect English Muffins
When it comes to mastering these homemade **English Muffins**, the ingredient list is short and sweet, which is just how I like it! We need the basics we always have on hand. Remember, the water must be lukewarm—too hot and you kill your yeast!
- Two cups of all-purpose flour—don’t stray on this one!
- One teaspoon of plain salt and one teaspoon of sugar for balance.
- One packet of active dry yeast, make sure it’s fresh!
- One cup of lukewarm water.
- And two tablespoons of good butter, melted, plus extra for buttering the griddle.
If you’re looking for other great, simple bread recipes without refined sugar, you should take a peek at my list of 4 healthy bread recipes. But for now, grab these staples, and let’s get baking!
Step-by-Step Instructions for Amazing English Muffins
Okay, now that we have our simple ingredients lined up, this is where the magic truly happens! Remember, when making yeast bread like our **English Muffins**, you need to be gentle. We aren’t making pizza dough here; we want tender results, so patience, especially with mixing, is key!
Mixing the Dough for Your English Muffins
First things first, let’s wake up that yeast! Whisk your dry ingredients—flour, salt, and sugar—together in a nice big bowl. That ensures everything is evenly distributed. Now, take your lukewarm water and sprinkle the yeast right on top. Let it sit for about five minutes; you want to see some foamy action, which tells you the yeast is alive and ready to work!
Once it’s foamy, pour that yeast water and your melted butter right into the dry stuff. Mix it up until everything is *just* incorporated. I mean it—just combined! If you see a few streaks of flour, that’s fine; we don’t want to overmix and make things tough.
Rising and Shaping Your English Muffins
Cover that sticky bowl, find a warm spot, and let it sit undisturbed for about an hour, or until it’s doubled in size. Once it has risen, lightly flour your counter. Turn the dough out gently—we are patting this into about a 3/4-inch thickness. No kneading allowed! Seriously, just pat it down softly. Grab your 3-inch round cutter and start punching out those beautiful circles. If you have scraps, pat them together and try for one more round, but don’t overwork them.
Griddling the English Muffins to Golden Perfection
Let’s get the griddle ready! You need to heat it over medium-low heat—this is crucial! If it’s too hot, the outside burns before the inside cooks, and we need that soft, fluffy center. Brush the hot surface lightly with butter.
Lay your cut rounds down gently. Now, here is the golden rule for incredible **English Muffins**: Do not, under any circumstances, ever press them down with your spatula! They need to puff up naturally. Cook them for about 8 to 10 minutes per side until they look perfectly golden brown. Once they’re off the heat, they need to cool completely before you slice the tops open!

If you’re looking for some great homemade soup ideas to go alongside your breakfast bread, you might want to check out my recipe for homemade wonton soup for a different kind of comfort!
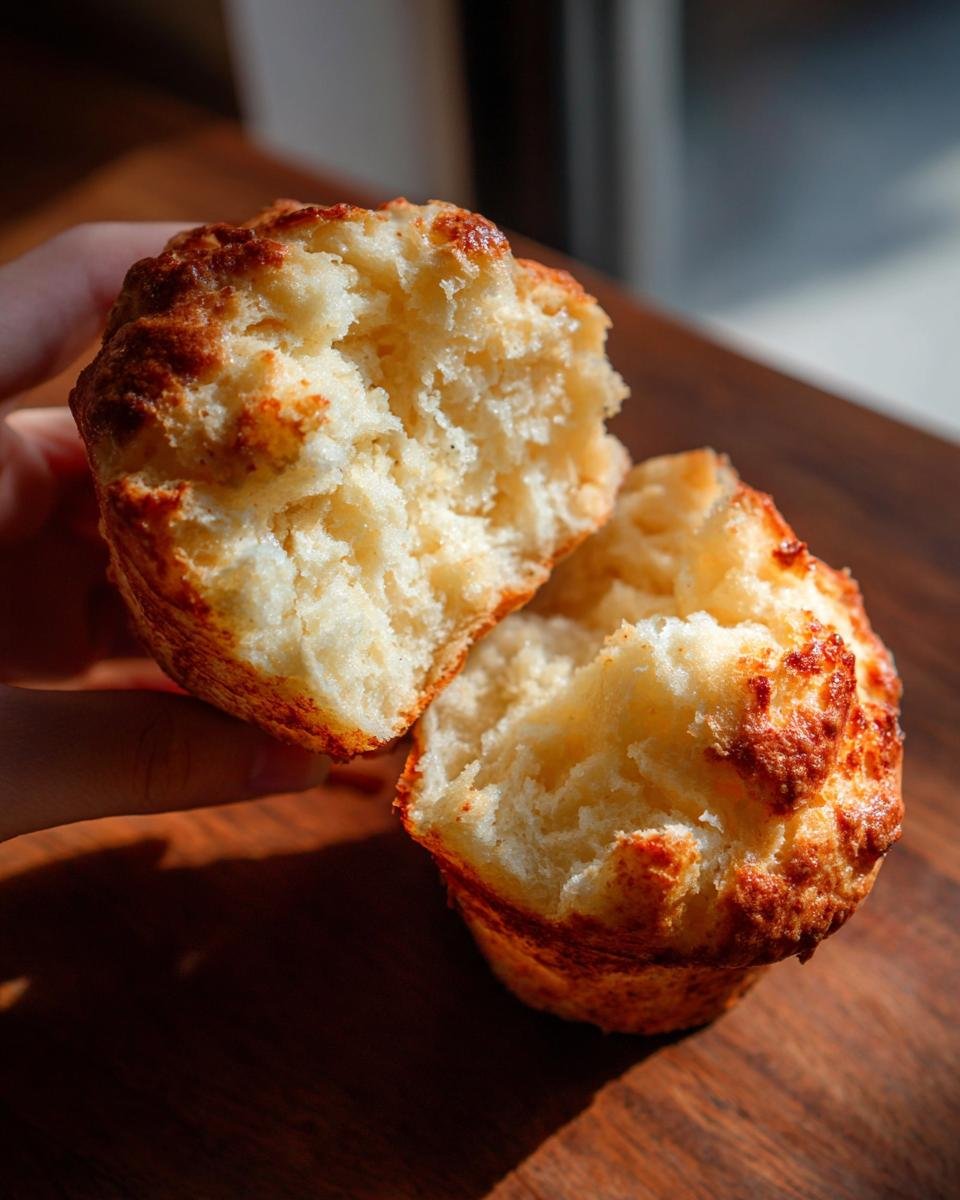
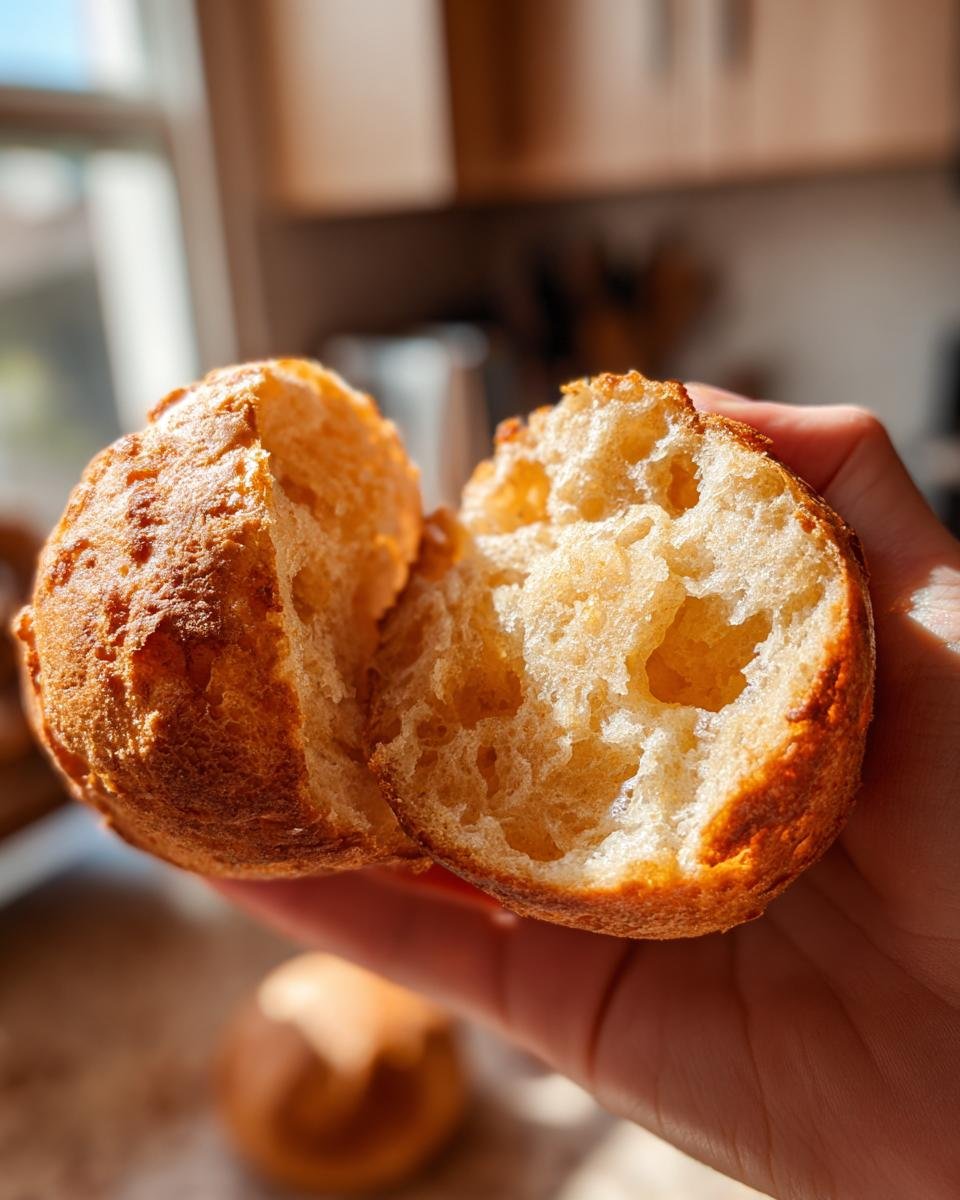
Expert Tips for Achieving Maximum Nooks and Crannies in Your English Muffins
Okay, you’ve cooked the muffins, they’re golden brown—now, stop right there before you slice them open with a knife! This tip sounds small, but it’s the secret handshake for truly iconic **English Muffins**. You must use a fork to tear them apart vertically. A knife squishes those beautiful internal tunnels shut, but the tines of a fork gently lift the layers, exposing every last little air pocket.
My other big piece of advice is about that heat! I mentioned medium-low, but let me tell you what happens if your griddle is too aggressive. If they turn dark brown in just three minutes, your heat is way too high. They won’t cook through, and you’ll end up with raw centers. Slow and steady wins this breakfast race!
These amazing homemade rounds are perfect for my savory sandwich recipe; I think you’ll love how they hold up! Check out the details on how I build that amazing lunch or brunch here.
Ingredient Notes and Substitutions for English Muffins
One question I get all the time is about swapping ingredients when making these **English Muffins**. Since this is a yeast bread, we need to be a little careful about what we change! I listed all-purpose flour because it gives you that nice, slightly softer texture we all love.
Now, if you only have bread flour handy, go ahead and use it! Bread flour has more protein, so your muffins might turn out just a tiny bit chewier, which isn’t bad at all, honestly. If you don’t have active dry yeast, instant yeast works too, but you can skip the 5-minute proofing step—just mix it right in with your dry ingredients.
Butter is important for that richness we get after toasting, but if you must substitute, melted coconut oil works in a pinch, though it changes the flavor profile slightly. For really amazing homemade condiments later, check out my recipe for homemade ketchup!
Why Homemade Breakfast Bread Beats Store-Bought
I have to be honest with you; once you master a simple yeast dough like this one, you’ll wonder why you ever bought the packaged stuff in the first place. Seriously, I used to just accept those pale, slightly chewy rounds, but now? No way! Homemade is just better in every measurable way when it comes to fresh bread.
When you make these griddle cakes at home, you control everything that goes into them, and the results speak for themselves. Here are the big reasons why I think you should always choose homemade:
- The Texture Win: Nothing compares to the feel of a warm, freshly griddled round that you split open with a fork. You get those crispy edges and the soft steam escaping from the center every time.
- Flavor Boost: That little bit of melted butter mixed into the dough? It makes a huge difference in the final taste you get when you toast your breakfast bread. It just tastes richer!
- Zero Squishing: Store-bought muffins often compress in the bag. Ours stay fluffy and light because we handle them so gently during the shaping stage. They don’t get squished flat before they even hit the pan!
- The Smell Factor: Need I say more? The aroma of yeast, warmth, and toasting butter fills your kitchen, making breakfast instantly feel like a special occasion.
If you’re looking for other amazing things to bake up when you have some spare time, you absolutely must look at my collection of four exquisite no-bake cake recipes!
Storing and Reheating Your Fresh English Muffins
The biggest challenge with making these glorious **English Muffins** is wanting to eat them all right away! They are actually best the day you make them, but don’t worry, they store well. If you have any leftovers, leave them out on a wire rack at room temperature for about two days. Don’t cover them tightly, or they’ll get soggy fast!
If you baked a big batch, they freeze beautifully! Just let them cool completely, pop them into a zip-top freezer bag, and they’ll stay perfect for about a month. When you’re ready to eat them, just throw them straight into the toaster. That toasting step is non-negotiable—it brings back that gorgeous crispness and melts any butter hidden inside those little tunnels!
If you’re planning a big brunch and need some sweet things on the side, you should see the delicious cookies I have posted too!
Serving Suggestions for Classic English Muffins
Sure, warm, slightly crispy, slathered with butter, these breakfast bread rounds are nearly perfect just as they are. I mean, if you want to just toast one up and spread some good raspberry jam on it, who am I to stop you? That’s classic comfort right there!
But honestly, these griddle cakes truly shine when they become the base for something a little more elaborate. For me, they are the absolute non-negotiable foundation for the best Eggs Benedict you’ve ever had. That nooks-and-crannies texture just soaks up the hollandaise sauce perfectly! You don’t want a squishy slice of white bread under your poached egg, do you? Absolutely not!
If you are going savory, try melting some sharp cheddar cheese right on top while they’re still warm from the griddle, and top that with a fried egg and a dash of hot sauce. Incredible! For non-breakfast uses, they make surprisingly great tiny hamburgers or even bases for mini pizzas if you use a nice sturdy one.
If you are planning a big spread of brunch items, you need something satisfying on the side! My recipe for this creamy ranch taco pasta salad is surprisingly great alongside something bready for a large crowd!
Frequently Asked Questions About Making English Muffins
It’s totally normal to have a few questions pop up when you’re trying a yeast recipe for the first time, especially for something special like **English Muffins**! I’ve gathered the ones I hear the most often below. Don’t worry if your first batch isn’t perfect; baking bread is all about practice!
Why are my English Muffins dense instead of airy?
Oh, that’s the saddest thing! If your homemade **breakfast bread** is dense, it almost always boils down to two things. First, did you let your yeast foam up properly in the water? If it looked flat, that yeast was lazy and didn’t create the air bubbles we need. Second, and this is the most common culprit: you mixed the dough too long! Remember I said the dough should be sticky and just combined? If you mix it until it looks smooth, you’ve developed too much gluten, and the result is a flat, heavy disc instead of wonderfully airy **griddle cakes**.
Can I bake these instead of griddling my English Muffins?
You *can*, but I really, really advise against it! The entire point of us going through this trouble is to get those trademark pale sides and deeply toasted tops that only happen when you cook these on a dry, lightly buttered griddle over low heat. If you bake them, they turn into regular little rolls, losing all that fantastic texture we worked so hard for!
If you absolutely must skip the griddle, you can bake them on a sheet pan at about 375°F until cooked through, but they won’t have the classic shape or those tell-tale lighter sides. They just won’t be the same great **English Muffins**!
How thick should the dough be before cutting the English Muffins?
This might seem minor, but thickness is everything for height and puffiness. When you turn the dough out onto your floured surface, you want to gently pat it down until it’s exactly 3/4 of an inch thick. No less, no more! If it’s too thin, they won’t have the height to split open nicely when you toast them later.
If you’re making a big batch for guests, don’t stress about making them all exactly evenly thick—just aim for consistency across the whole sheet. If you need ideas for using up leftovers that aren’t breakfast or sandwich related, I have a neat recipe for one-pot macaroni cheeseburger soup that can use up some savory baked goods!
Nutritional Snapshot of These English Muffins
So, you’ve made these amazing, fluffy **English Muffins**, and now you’re probably wondering what all that deliciousness does to the day’s macros! I always track these things loosely, but remember, since we are making them from scratch, the numbers are always going to vary slightly based on the exact flour, salt, and butter brand you use.
This estimate below is based on using the standard ingredients listed for one whole muffin—and please don’t forget the disclaimer: this is just a ballpark estimate based on standard ingredient weights and measuring. It’s a pretty solid base for homemade breakfast bread, though!
If you’re keen to learn more about how common ingredients stack up, I have a great read on the surprising sugar content of fruits that is always eye-opening!
- Serving Size: 1 muffin
- Calories: Approximately 180 per serving
- Total Fat: About 4 grams (with 2 grams as saturated fat)
- Carbohydrates: Around 32 grams, which comes mostly from the flour.
- Protein: A helpful 5 grams to start your day!
- Sodium: 250 mg
For a quick bread, those numbers are fantastic, especially when you consider how much higher the sodium and preservatives often are in the store-bought versions. You control the salt, the fat, and you get zero unpronounceable chemicals!
Print
Simple English Muffins
- Total Time: 1 hour 35 min
- Yield: 8 muffins 1x
- Diet: Vegetarian
Description
A straightforward recipe for making classic English muffins at home.
Ingredients
- 2 cups all-purpose flour
- 1 teaspoon salt
- 1 teaspoon sugar
- 1 packet active dry yeast
- 1 cup lukewarm water
- 2 tablespoons butter, melted, plus extra for griddling
Instructions
- In a large bowl, whisk together the flour, salt, and sugar.
- Dissolve the yeast in the lukewarm water and let it sit for 5 minutes until foamy.
- Pour the yeast mixture and the melted butter into the dry ingredients. Mix until just combined into a sticky dough.
- Cover the bowl and let the dough rise in a warm place for 1 hour, or until doubled.
- Lightly flour a surface. Turn the dough out and gently pat it into a 3/4-inch thick rectangle. Do not overwork the dough.
- Use a 3-inch round cutter to cut out the muffins. Reroll scraps once.
- Heat a griddle or large skillet over medium-low heat. Lightly brush the griddle with butter.
- Place the cut muffins on the hot griddle. Cook for 8 to 10 minutes per side, until golden brown. Do not press down on them while cooking.
- Remove from the griddle and cool completely on a wire rack. Split with a fork before toasting.
Notes
- Use a fork, not a knife, to split the muffins for maximum nooks and crannies.
- For best results, cook the muffins slowly over lower heat.
- Prep Time: 15 min
- Cook Time: 20 min
- Category: Breakfast
- Method: Griddling
- Cuisine: American
Nutrition
- Serving Size: 1 muffin
- Calories: 180
- Sugar: 1
- Sodium: 250
- Fat: 4
- Saturated Fat: 2
- Unsaturated Fat: 2
- Trans Fat: 0
- Carbohydrates: 32
- Fiber: 1
- Protein: 5
- Cholesterol: 10
Keywords: English muffins, homemade muffins, breakfast bread, griddle cakes